From the German 'Kabinettskriege' - Cabinet Wars: a period of limited conflict from the Peace of Westphalia (1648) to the French Revolution (1789).
Showing posts with label Terrain. Show all posts

Ready for my CoC v2 Debut

Before embarking on our next Chain of Command campaign, John and I need a few familiarisation games with the new, improved, second edition of the rules, or CoC2 for short.  

Today I set out my table based on the 'Probe' game scenario from the TooFatLardies' Kampfgruppe von Luck 'Pint-Sized' Campaign (pdf) - see the map below.  


My best attempt to replicate this is shown below, viewed from the German's side of the table.

In the campaign description the road from the Y-junction up to the farm is a sunken road.  As I couldn't easily recreate that I opted for high banked bocage hedge either side of the road which will both provide good cover and obstruct movement (especially vehicle movement).

As could probably be inferred from the map, the scenario sees a German Panzergrenadier platoon, from 21st Panzer, attacking a British Airborne platoon just after D-Day (D+1).  As I don't have any airborne troops I'm using a regular British platoon in its place, and giving them an extra 2 support points to compensate for their lower platoon force rating.  This gives the British 6 support points against the German's rather scary 13 points given they only need to get a team to the British baseline to win the game.  However, if the game is over pretty quick it will give us a chance to re-set and play again, as after all the name of the game is practise.

The game is in a couple of days' time but the AAR will be along eventually.

CoC Anti-Tank Trainer Scenario

John is coming round for another Chain of Command (CoC) game, probably our swan song with version 1 as version 2 is due for release at Partizan later this month.  Because we don't want to start another campaign until we have the new rules this one's going to be an anti-tank refresher.  We're using the Flank March scenario as we haven't played that one.  John will have a Panzer Grenadier platoon and 7 points of support to try and hold off my British infantry platoon with 19 points!  As the object of the game is to get more practise in how to cope when only one side has tank support, the brits may only spend their support points on AFVs and the Germans may not spend them on any AFVs with an anti-tank capability.

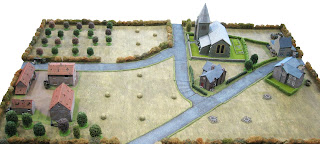
I have just set up the terrain in the cabin as shown below: 


The Germans will be defending the corner containing the church and the British will be entering from either, or both,of the opposite table sides (the top and righthand sides in the above).

In the next view, from the attacker's (British) perspective it can be seen they have good cover approaching from the left, but limited access for their armour.  The direct approach has room to manoeuvre but little or no cover.


The next two photos show the terrain from the narrow table sides, the first showing the second approach route for the Brits.


And, finally from the German perspective.


Conington Contraband

[Pre-Cabinette Archives c.2014!]

The shocking age of this article explains the appalling photographs and the rather basic terrain on show with chalk roads and outlines to the woods.


This Table-top Teaser was designed give my new scratch-built houses a baptism of fire under Brig. Young’s CHARGE! rules.  It was also an experiment on adding in the roll-of-shot stick and templates for canister and howitzer shells from C S Grant’s ‘The Wargame’. 

The Scenario: involves a government force dispatched by the Elector to locate and seize contraband defended by a rebel militia supported by a small expeditionary force from a foreign, ‘francophone’, power.  Spies in the service of the Elector have reported that the rebel war-chest and records have been moved to Conington; their capture would deny the rebellion badly needed funds and provide the Electoral forces with an intelligence wind-fall.  Scouting patrols indicate the location is not well guarded and a rapid strike by a small force could get in and out before the main rebel army could respond.   To this end the Elector commanded Oberst Franz Schmidt to take a brigade of infantry, with attached cavalry and artillery, and seize any, and all, contraband in Conington, but with strict orders to return to camp before nightfall (i.e. a time limit of 15 moves within which to find the contraband – the return march is not played).  The contraband is in Conington but its precise location is unknown, therefore each house must be entered and searched.   To search a house, after any enemy have been ejected, requires 4 figures and takes a full turn.  A D6 is thrown to determine if the contraband is found; a ’6’ is required for success in the first house searched and the score reduces by one for each subsequent house searched (a house can only be searched once).  Because there are only five houses in Conington (see map below) there is a small chance that it will never be found; in which case, it was either never there or was conveyed to safety by the rebels.   


Oberst Schmidt’s brigade (organised for CHARGE!) can deploy anywhere within the area marked ‘A’ on the map (8x5 ft) and takes the first move and consists of:

  • 4 Coy.s Arberg Inf. Regt. (80 fig.s)
  • 4 Coy.s Diesbach Inf. Regt. (80 fig.s)
  • 2 Sqn.s Hohenzollern Dragoons (20 fig.s)
  • 1 Artillery btty, (2 x 6 pdrs; 1 x 5” howitzer)


The rebel force, under Chevalier Pierre Réverie, may deploy anywhere in or north of the southernmost woods and consists of:

  • 2 Coy.s of Rebel Militia (33 fig.s)
  • 2 Coy.s of French Militia (33 fig.s)
  • 2 Coy.s Grassins Light Inf. (33 fig.s)
  • ½ Sqn. Fischer Chasseurs Cav. (5 fig.s)
  • 1 Foreign Cannon (6 pdr)

The rebel force is actually weaker than the Electoral forces believe as one of the foot companies only exists in their imagination.  The rebel player secretly determines which company is only a decoy by rolling a D6: 1= Rebel Militia; 2-3 = French Militia; 4-6 = Grassins.   The decoy unit is deployed like any other but is removed once it would be visible to Electoral troops. 

Special rules: the rebel militia are allowed to skirmish like light troops but at half effect, i.e. only every second figure can fire.  Also, on each turn the rebels throw a D6 and if a ‘6’ is rolled any dead rebel militia figures may enter as a new unit through one of the zones labelled ‘X’ on the map.  To re-enter the militia casualties must include an officer or NCO to lead them.

The Game: started with rebel militia occupying the farmhouse at Dawes Lot and the wood immediately south of it (1 on map) while the wood to the north held a Grassins company (2).  The Fischer chasseurs waited further north (3) with the Grassins in the wood behind them (4).  The Chevalier posted the French militia companies in the town of Conington (no doubt to show off my new houses)...


...and set up his artillery piece to fire down the road approaching Conington (5).


The Chevalier's deployment was bold, but risky, as the Grassins in the wood by Prescott House (2) were only a decoy leaving the approach through woods to west of the Conington road unguarded.  However, the gamble paid off as the Electoral forces massed their forces along the road and against the militia in and around Dawes Lot (see photo, NB: house shell has been placed alongside the internal ruins to show the garrison within).  


To cut, what could be, a very long story short, the Electoral forces after taking Dawes Lot realised advancing on such a narrow front would take too long. Instead, orders were issued to advance on a wide front through woods on both sides of the road to exploit their superior numbers and swamp the defenders.  


In the preceding photo, the furthest wood on the left can now be seen to be occupied by local militia.  The approach on a wide front by Herr Oberst's men meant that they had clocked that the rumour of Grassins in the that wood was just that, a rumour, as the figures were removed.  The rebels were then lucky enough to roll a '6' and 'resurrect' the militia lost at Dawes Lot to oppose this line of approach.  


The change in approach by the Electoral troops proved the turning point as each line of defence was overwhelmed in turn.  Despite this, time was running short when the Electoral troops reached Conington and started storming the houses in search of contraband.  As the fifteenth move arrived a fourth house had just been seized but the church remained untaken (again house 'shells' have been placed next to their internal 'ruin' in the photo).  


Then, as the recall was sounded, Schmidt heaved a sigh of relief as the last house search ‘located’ the contraband.  Success had been snatched from the jaws of failure and the lack of progress in the early turns would go unnoticed in the warm glow of victory.

The game turned out to be a nail-biter and the houses proved functional and looked the part.  The artillery experiment was not a success, as we both found the devices too unwieldy despite the entertainment afforded by a randomised howitzer shell landing on friendly troops.  


PS: I never took any photos of the round shot bounce stick during the game, but it can be seen in the final photo of an earlier post entitled 'Tool Time'.  It is the stick at the top of the photo and alongside it can be seen the die with faces coloured to match the white, yellow and green bounce zones that determines where casualties will be inflicted.


Belgian Chocolates & Ludus Gladiatorius

I do like Belgian chocolates, but some years ago when offered some, I was taken with the box as much as the contents.


The contents were scoffed pretty quick and I claimed the box and have been holding on to it ever since to be refashioned into an arena for my 15mm gladiators.  However, like so many planned projects, nothing happened for years but recently when clearing out a cupboard I came across it again and decided it was time to do something about it.

So, here it is.


The images, including the Ludus Gladiatorius board were all found on the net and printed out on A4 label paper, cut out and stuck onto the box.  The playing area has a layer of ferro-sheet underneath and all the figures (and pillars) are based on magnetic tiles.  There are a couple of layers of foamboard in the box lid such that the inner sits up higher to create that nice amphitheatre look.

The figures, IIRC, are 15mm Chariot Miniatures that have been painted and waiting years for somewhere to play.


I am making record sheets for players and cards for use as a QPS, the latter can also be used for dealing out gladiator characters.  The card designs, see examples below, will be printed out on label sheets cut out and stuck on playing cards.


Well?


New Roads to Nowhere

For the last couple of days, I have been painting my new latex roads from Early War Miniatures (EWM).  These were a joint birthday present from my family who all chipped in as I wanted to make sure I would have more than enough for any future Chain of Command (CoC) game.

This was my first serious use of acrylic paints as I figured they would be less likely to flake off than my usual enamels.  And overall, I think they look pretty good, albeit the grass bank could've done with being a little less green to blend in with my fleece mats (from Tiny Wargames) - see below...


...and a slightly better close up.


The road sections consist of: 10x long straights; 2x long curves; 4x short straights; 10x short curves; 4x T-junctions; 2x Y-junctions; and, 2x crossroads.  With long sections about 12" in length, short straights and Y-junctions 6", and the rest 4", this makes approximately 18 feet of road, much of which can be seen below...


...and from the other side.


One thing that did become apparent when laying out the roads for a photo shoot, is that the sections are not designed to fit on a grid.  This means closed loops will need to use a symmetric arrangement of sections - annoying but unlikely to be required on a 6'x4' CoC layout.

WiP Basing and Some Away Games

While I've finished the basing fix for my SSM figures (last post) basing is still dominating my painting desk.  This time it's painting, texturing and dry-brushing the bases for some Games Workshop Lord of the Rings figures to allow my skirmish game to expand so I can play Dragon Rampant or similar.  Doubting I'd ever get the figures painted myself (too much else in the queue) I sent them[1] off to Fernando Enterprises in Sri Lanka.  

They took longer than I was expecting (c. 6 months) and there was a lot of to and froing as they sent pictures and I requested improvements but eventually they arrived.  I was pleasantly surprised to find the figures look much better in the hand than in the photos they sent for approval; the images they send are very small.  Now I just had some minor repairs and touching up to do, plus a lot of base work - I had decided to not let them finish the bases as I knew the painting style would be very different to mine and I wanted to make the bases the same as my other figures to help them blend in.

So, first, some of the 'bad guys', goblins ...


... and Warg riders (I don't like Peter Jackson's take on Wargs).


And, ready to ride down everything in their path, THE ROHIRRIM!


I still have some touching up to do on the Uruks, which seem less well-painted than the rest (different painter?) but that shouldn't take long now.  So with all these 'armies' gathering war is imminent; no doubt my giant eagles will keeping an eye on things.


As a pleasant interlude during all this, fairly tedious, basing work, I went down to Steve's place for a weekend's gaming get together with some others.

The first game was a 'chit game' of the Battle of Liegnitz (1241) which, true to history, was won by the Mongols.  I came seventh out of seven once the VPs were totalled but comforted by the prettiness of my troops (Martin's vintage 15mm Minifig Knights - I had more than this but I liked this close up).


Other games included chariot racing with a modified version of Circus Maximus using Martin's Essex Miniatures chariots ...


... and 6mil Napoleonic game on Steve's sculpted Waterloo terrain (really need to get the backdrop sorted).


This was a fictional Austrian-Bavarian clash (not sure how they ended up in Belgium) and really a play-test for my modified version of Jeffrey's Napoleonic rules as I very much like the command and control system.  The game showed promise but there's still work to do.  This was not too surprising as I had been adapting it to play on a hex-grid and had to rapidly adjust it for a free-form game on the sculpted terrain, but it is so pretty I'll add a few more photos.


That's all for now.


Notes:

[1.] The lot consisted of: 57 Goblins; 14 Uruk Hai;  7 Goblin Warg riders; 14 mounted Rohirrim and 12 on foot plus a mounted Eomer figure; and, 12 Ithilien Rangers plus Faramir (on foot). 

Final Objective in Sight

Our Maltot Chain of Command (CoC) campaign has reached the 6th game and the 5th and final map / scenario on the ladder.  A win here for British, and they will get three attempts to do so, will win the campaign for them.  To escape the jaws of defeat, the Germans must prevent the British from taking their final objective, the church.

The terrain is now all set up and ready for the games to begin on Monday morning.

The view from the east, the British enter from the right and must take the church on the left.


The view from the west, the British enter from the left and must take the church on the right.


The Germans have finally decided to call up reinforcements in the shape of SS panzergrenadiers, and the British have withdrawn the remnants of 12 platoon and will field the fresh, and full strength, 16 platoon, both from the 5th Wiltshires.

CoC Maltot Campaign Game 5 - Terrain

So, with my terrain updated, I set out the table for the next game in our campaign which takes place two days' time.

German Defence                      <= British Attack

British Attack =>                      German Defence

View from the British Start Line

View from German Lines

All in all, this looks like a tough nut for the British (me) to crack, especially for an understrength platoon.  In reality I reckon this would be, at the very least, a company objective. 

Any suggestions on how best to crack this one would be very welcome...


Obstacles for Chain of Command

Just a quick post on a couple of additional obstacles for my Chain of Command games set in 1944 Normandy.  I have three barbed wire entanglements already but the rules allow up to four, and as my others are all on grass, I thought I'd make the fourth to go on a road or paved area:


The barbed wire was from 'Go To Ground Wargaming' and IIRC the barriers were from 'Early War Miniatures' (EWM) but I'm not sure and can't find them on their web store which is still being reconstructed.

Then to provide a roadblock I used some Czech hedgehogs, possibly also from EWM but I can't be sure for the same reasons.


The bases for both are just a thin layer of Milliput on ferro-magnetic sheeting for ease of storage in my boxes lined with magnetic tiles.  I have some doubts about how dark the bases are but as I intend to redo my roads (currently only painted strips of cardboard cut from cereal boxes) I will probably have to redo them at some point.  Also got some more roadblock obstacles from 'MarDav Miniatures' - these are like Czech hedgehogs but more extemporised and embedded into the road.


Normandy Terrain Quick Fix(?)

As the next map scenario in my 20mm WW2 Chain of Command (CoC) campaign has even more buildings than the last (see my last CoC post) I thought I should try and improve the look of my games.  Inspired by the blogger 'The Tactical Painter' I decided the best way to do that is to make bases for my buildings, which I think much improves the look of the thing...


Being an impatient cheapskate, I decide I would simply use some stiff card to make the bases with some texturing (pva glue and sand), leftover model railway grass sheets, hedges (pan scrubber or sponge cover with flock) and some walls I already had. 


My intent was that this would be a quick'n'dirty fix, but what I didn't allow for was my 2ft square modelling/painting desk.  This made it very hard to do anything else while one piece was drying.  Luckily my wife went away for a few days visiting a friend allowing me to spread the work in progress all around the house.  This helped me make much better progress, albeit there were several setbacks that required re-work, but in the end, it was done and a photo session followed.


To better illustrate how the bases better integrate the buildings onto my terrain mat there follows a series of '
with and without' photos, that I hope make it look like a worthwhile exercise.