From the German 'Kabinettskriege' - Cabinet Wars: a period of limited conflict from the Peace of Westphalia (1648) to the French Revolution (1789).

Caesar's Camp - Scenario 3 - CoC AAR

Capturing Caesar's Camp, 3rd June 1940 - a pint-sized campaign 

The two earlier scenarios in this campaign were flanking actions separate from the rest of the campaign which now starts in earnest with Scenario 3.  From now on any casualties will be carried forward, reducing the force available for the next scenario.  

Scenario 3 - 'Up the Route Nationale'

As a result of the earlier scenarios, the Germans start with a full CoC die for having achieved the objective in Scenario 1, but as they didn't actually win that scenario, they don't get the free off-table machinegun firing from the northern edge (actually French friendly fire).

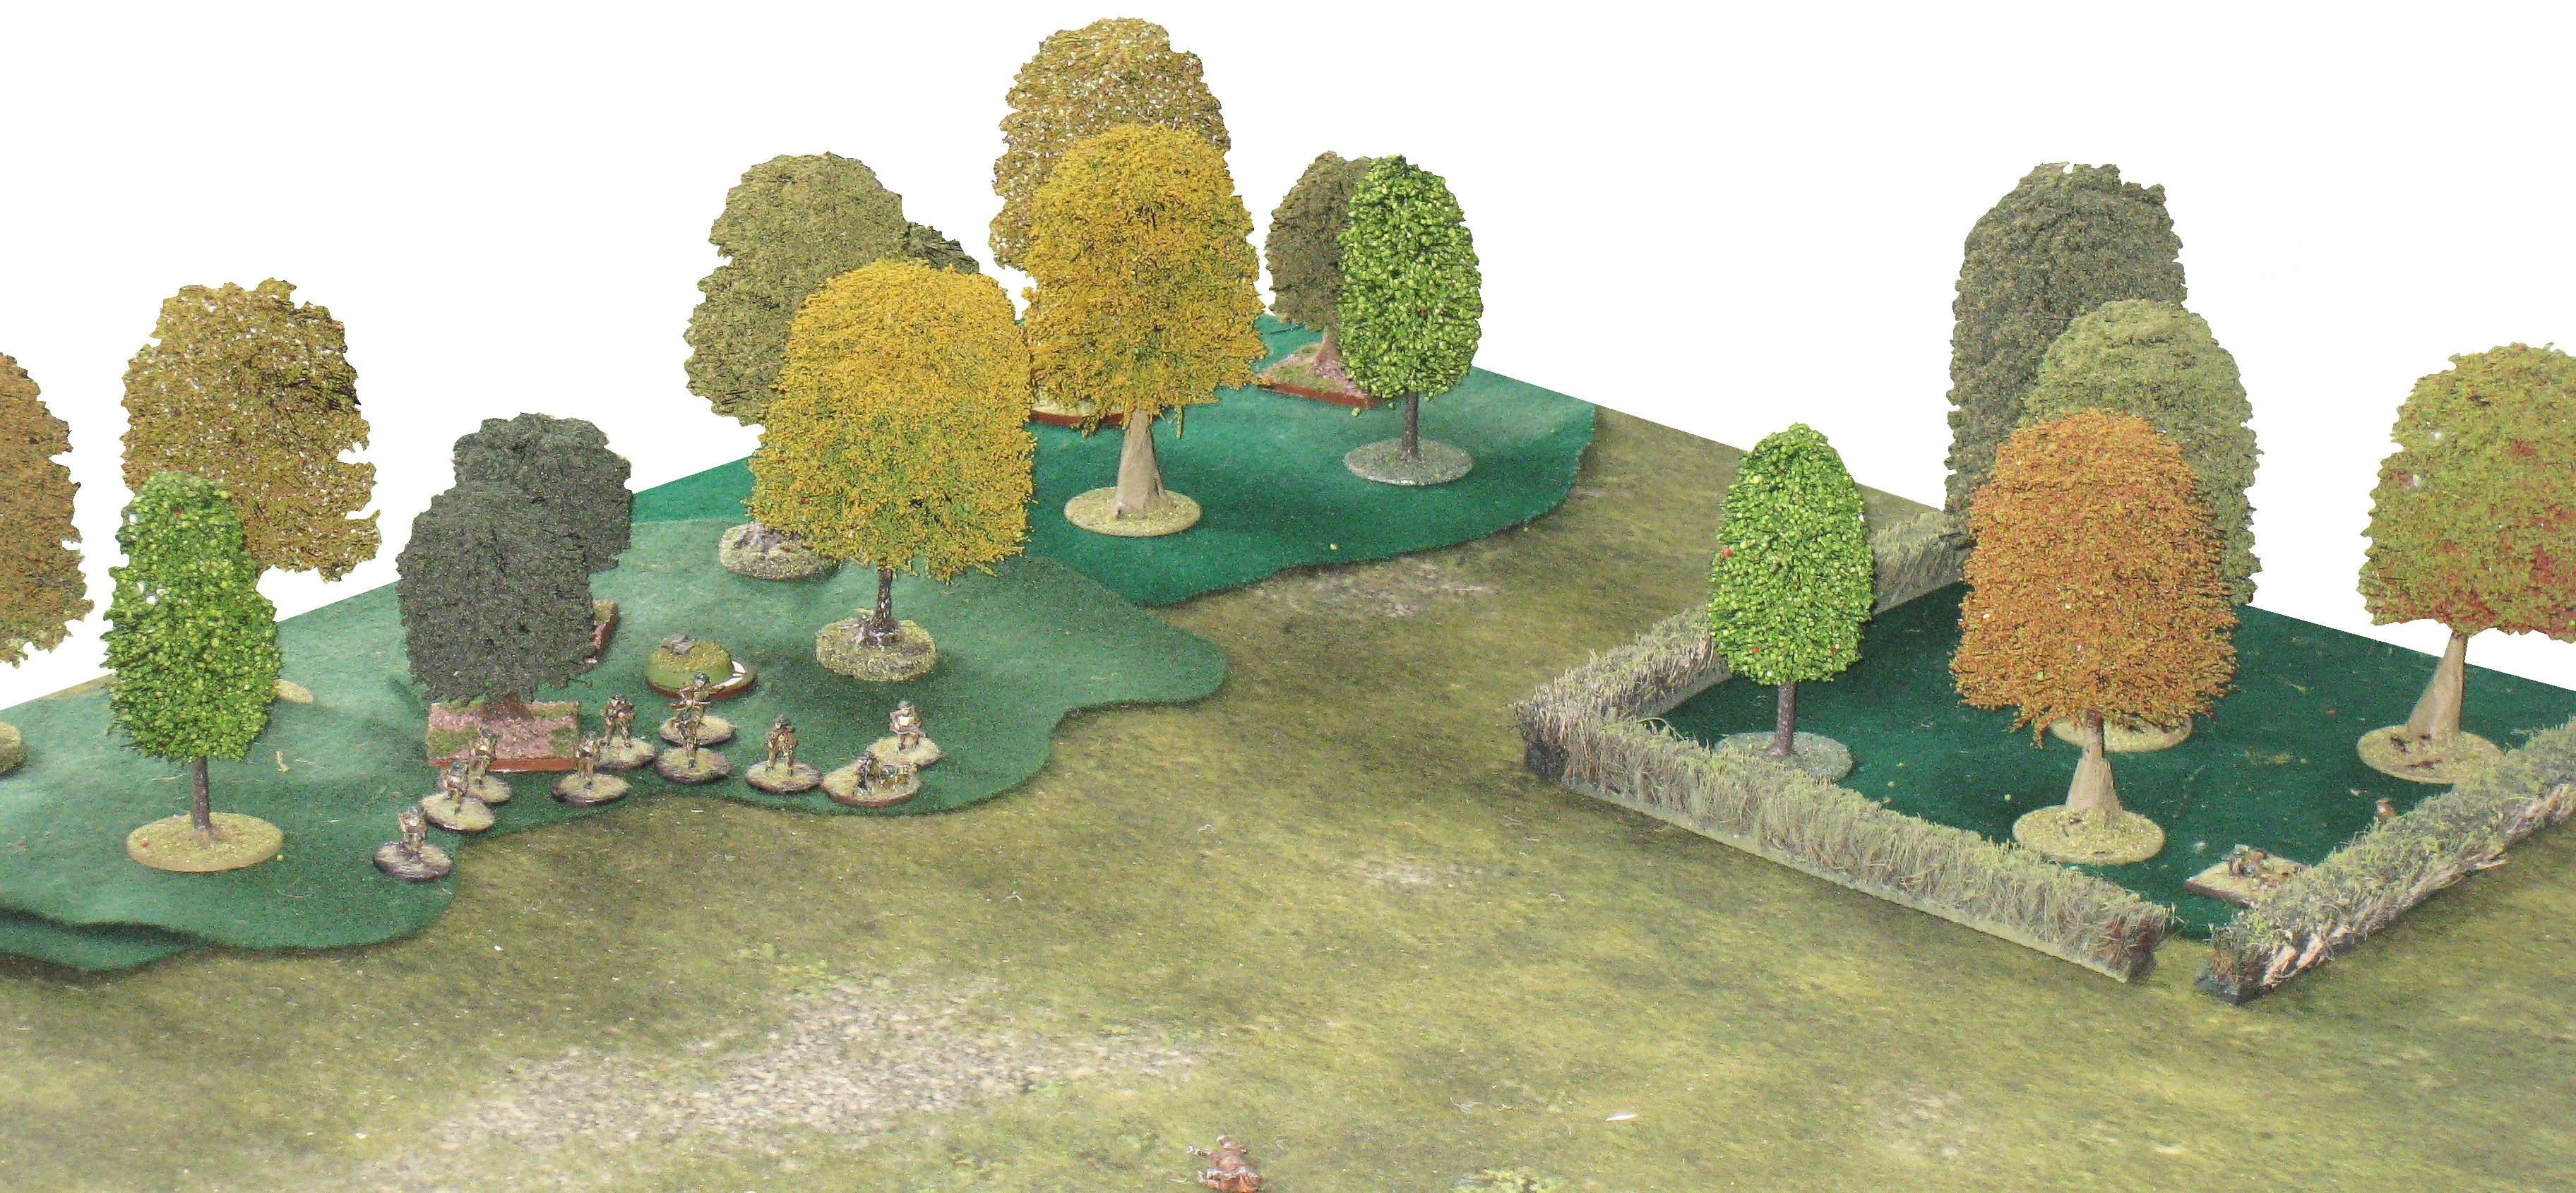
The terrain for this game was shown in the last blog but for completeness, here it is again, viewed from the German, eastern, end.

The map for this scenario, oriented with north at the top and showing the start lines for the patrol phase, is shown below.


The British objective is to defeat or drive off the German outpost line from this table as quickly as possible so they can progress onto the next.  For the Germans (me), knowing this platoon has to carry on the fight in the next scenario, means it is important not to lose too many men here.  And, what makes this scenario so tricky, is the British ability to field several armoured vehicles while the Germans can only field one anti-tank weapon which will cost them 4 of their 6 support points.  This was going to be a tough one.

Initially the omens were good as the Germans continued to throw better than the British for Force Morale, starting on 10 to the Brit's 8.

The Patrol Phase

John's British rolled better for initial patrol moves before the start of the Patrol Phase proper, rolling a 6 to gain 3 free moves.  Despite this, I was fairly satisfied with how the patrol phase played out; the final, 'locked down', position of the patrol markers (3 British & 4 German) being as shown below.


Unfortunately, I goofed when placing my Jump-off Points (JOPs)[1], and ended up with all three in the Eastern Wood, as planned, but none where I wanted them; two ending up pretty close together. 

John's JOP placement was much better thought out, and he ended up with two well placed in the sunken road and one back where the Route Nationale entered on his edge of the table.


Following the Patrol phase, we both selected our support units.  For the Germans, I was convinced the British would turn up with plenty of light armour, so felt compelled to opt for a Pak 36 3.7cm anti-tank gun (ATG) costing 6 points.  With the remaining 2 points I selected an off-table machinegun firing from the southern table edge as there weren't any other very useful options for just 2pts.  John's Brits selected, undisclosed to me at this point in the game: 3x Bren Carriers with junior leaders and Bren teams[2] (3pts each = 9pts); 1x 2" mortar team[3] (2pts); and, 1x Adjutant (1pt), for a total of 12 support points.

Then, as per the campaign scenario description, the British took the first phase.

The Game

John promptly rolled a double phase to get the game started!  This was not critical, but it was frustrating, as I was also hoping to pick up a lot of CoC points[4] while John marshalled his forces to attack across the open ground to get at the Germans.

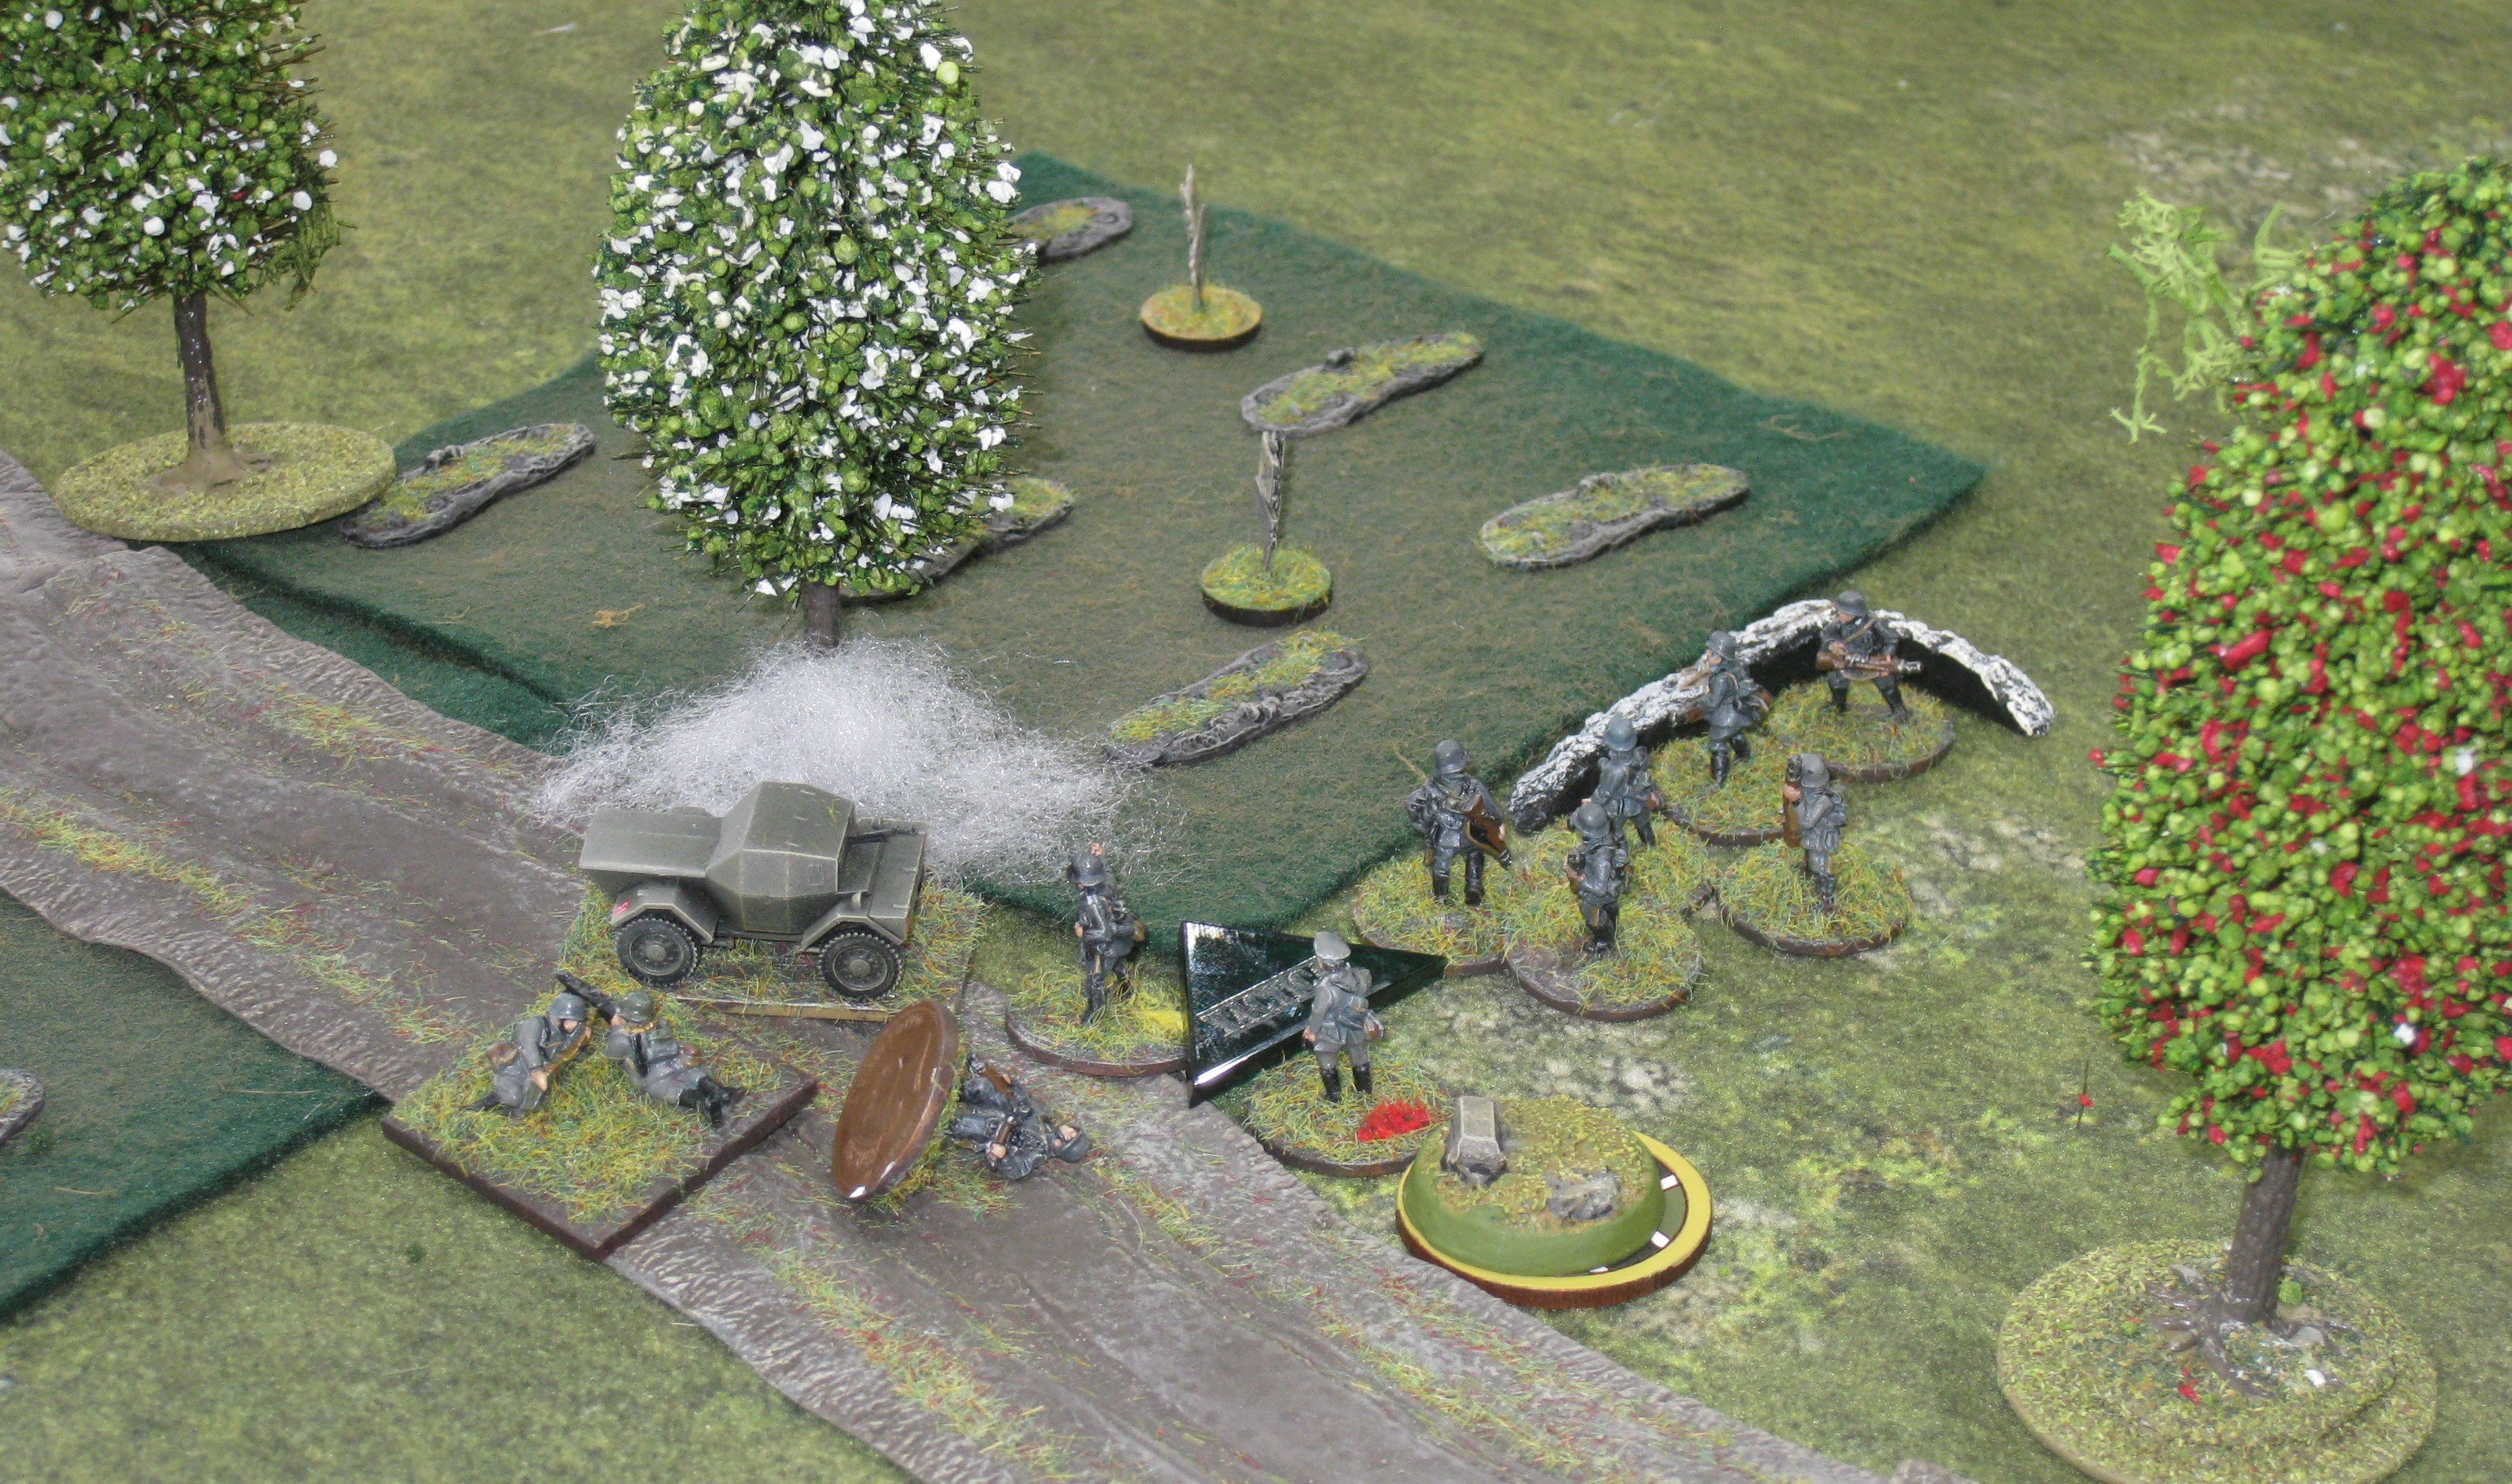
With their two phases the British deployed a section in the sunken road, from the more northerly of the two JOPs ...


... and another section and a carrier on the Route Nationale.


No doubt he would've deployed more if he'd been able to but he also threw quite a few '5's to get his CoC points total building up nicely.

My first phase predictably saw the Germans do nothing; patiently waiting for the British to expose themselves.  But, at the same I was a little disappointed not to get a single '5', but early days yet.

Over the next handful of phases, as the Germans kept their powder dry, the British methodically built up their forces as they prepared for a well-supported and coordinated push.  This included: a senior officer and 2" mortar team with the section already in the sunken road; ...


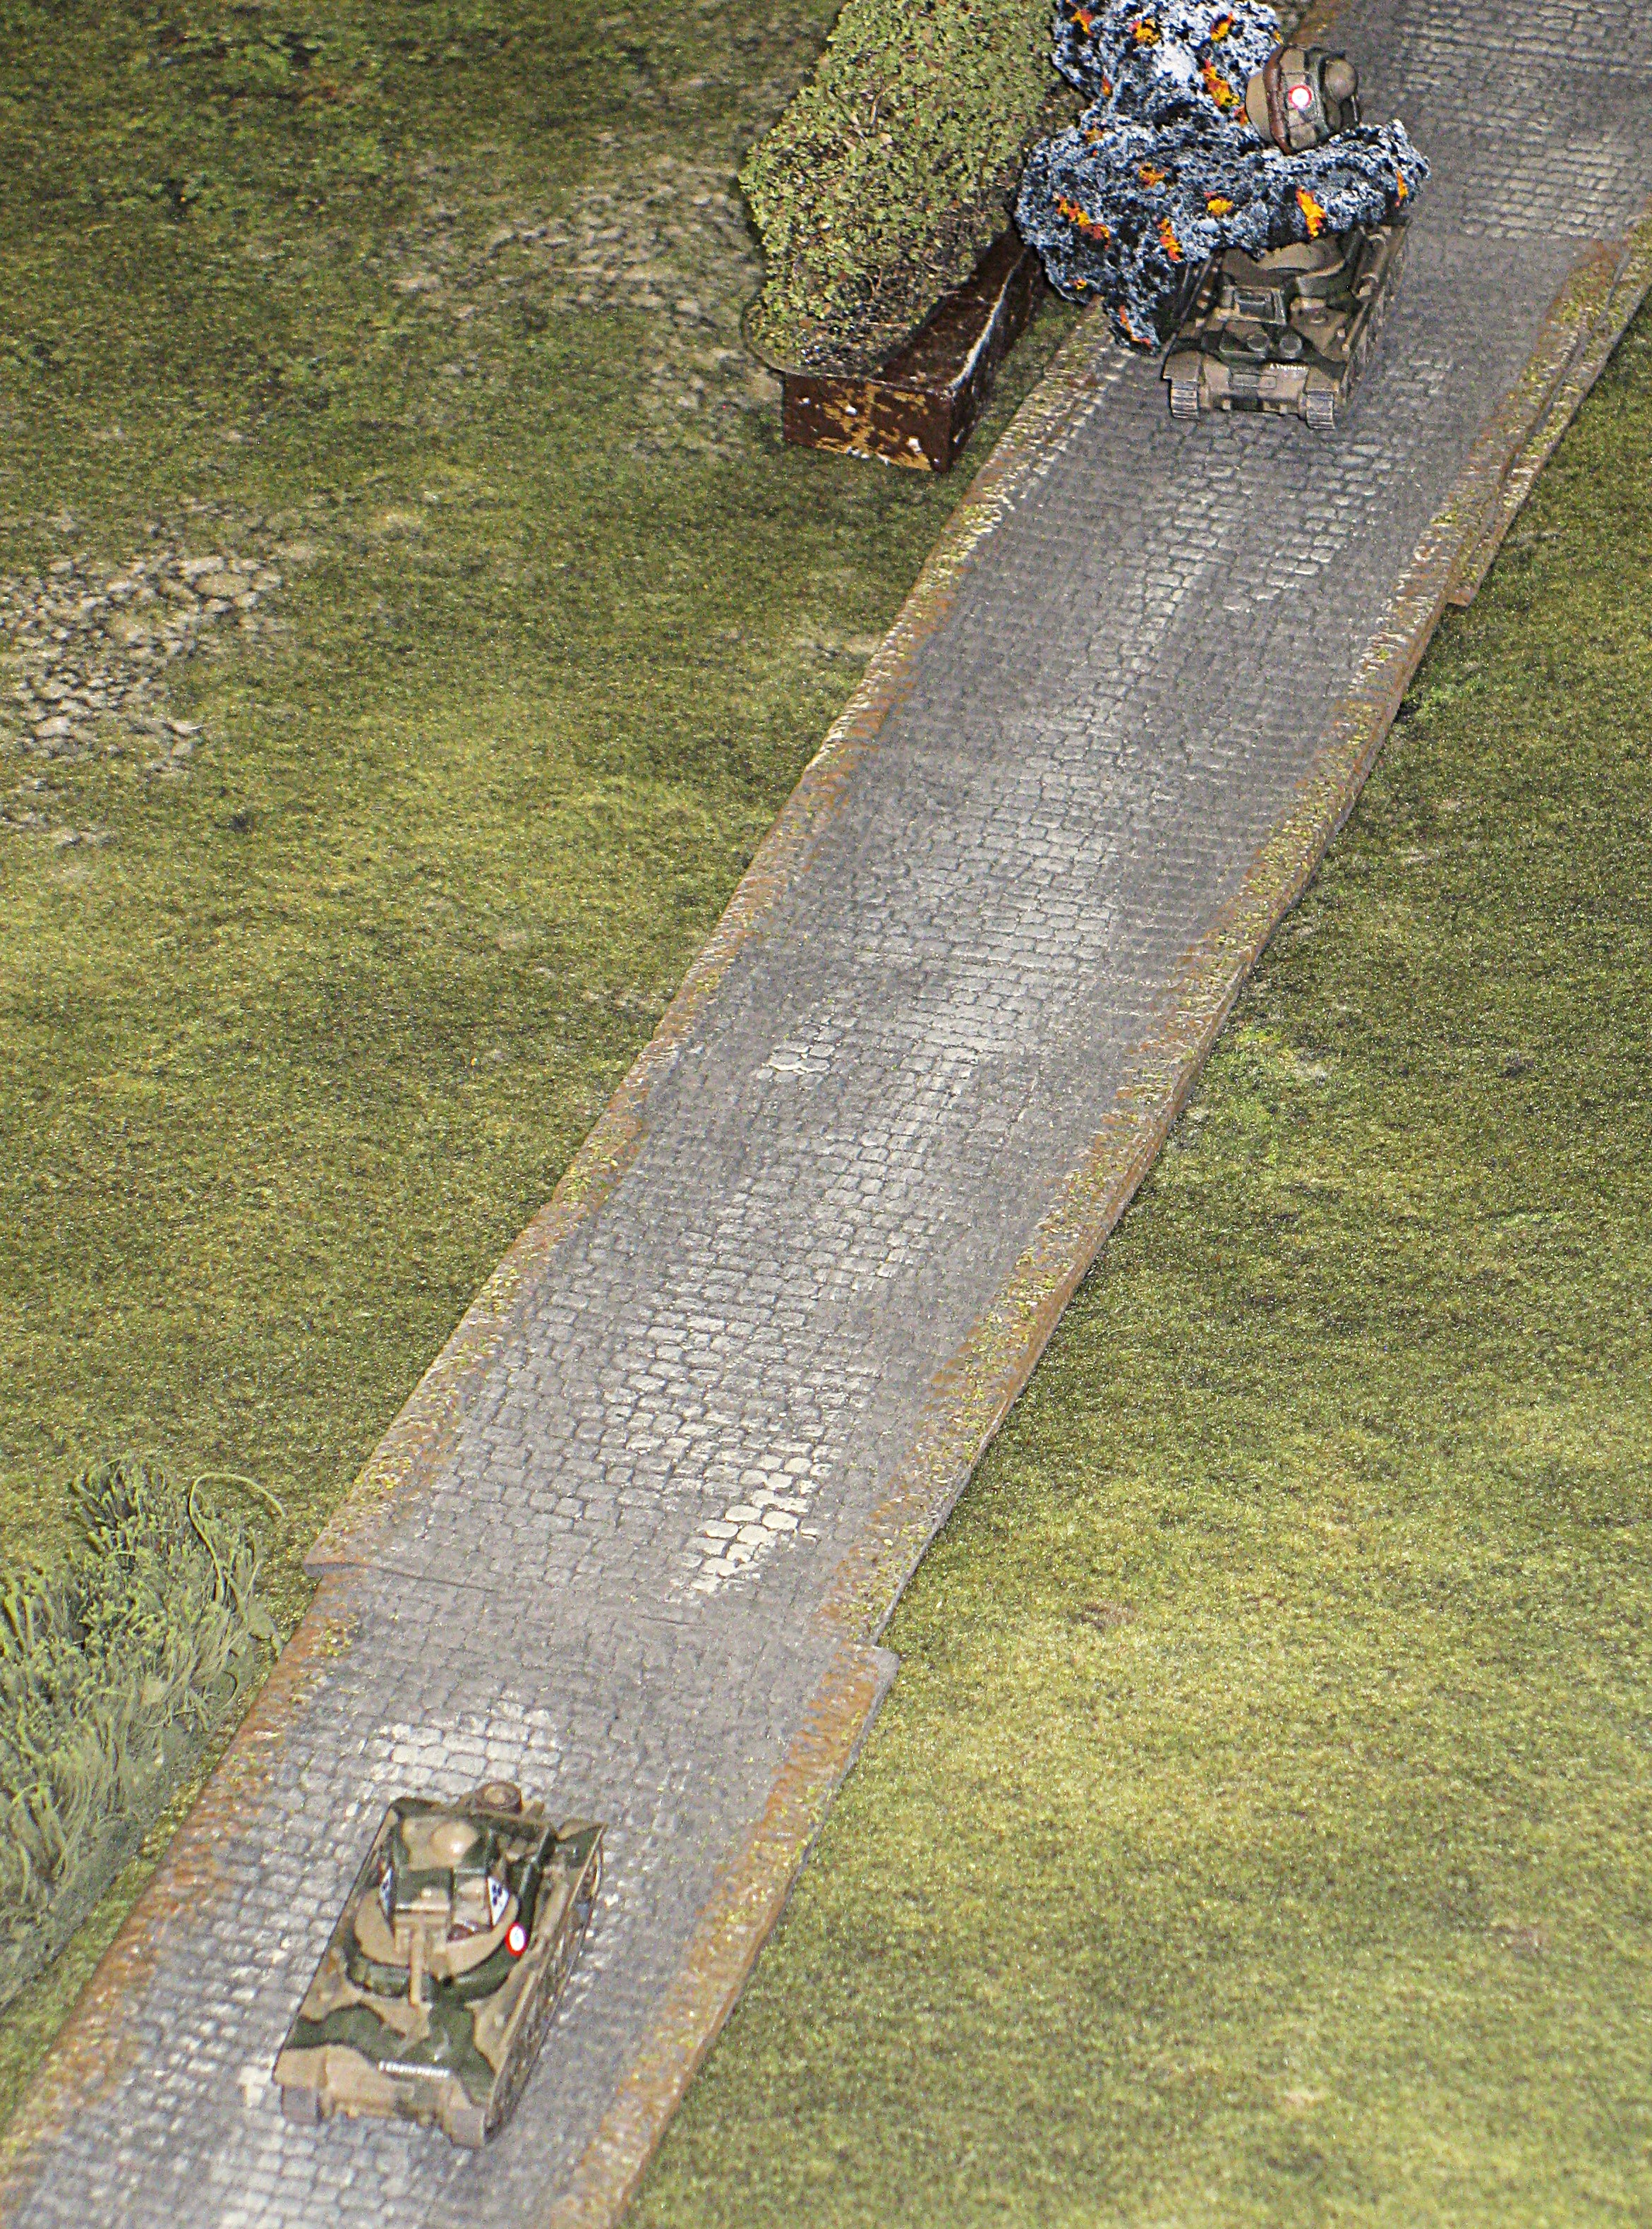
... and two more carriers to accompany the section and carrier deployed on the Route Nationale, who started to cautiously advance up the road towards the other section.


This included the senior leader commanding carriers in his the Boys ATR equipped carrier; boldly leading from the rear!


All this time, my hope, to accrue CoC points in the early phases were dashed, with only one '5' in my first five phases!  And, just to rub it in, John had been steadily rolling them, and had overtaken me despite my free CoC die head-start.

Now, as they were close to ready for their big push, the ubiquitous British smoke started to appear, albeit not where they intended; this was aimed at a point half way between the corner of the wheatfield and the point where the hedge meets the wood.


To reinforce the support for any advance to contact, their final section, complete with the second 2" mortar team and senior leader, deployed in the bend of the sunken road, south of the other section.


Here at last was smidgeon of opportunity!  In my next phase I deployed my off-table MMG at a point on the eastern bank of the sunken road where it crossed the southern table edge.  This allowed it to fire along the road, up to the bend, and target the section just deployed, who had gone 'Tactical'.  

John interjected to spend three points of his growing CoC pile for the mortar team to 'Hit the Dirt' to get them into soft cover.  And the net result from ten fire dice?  Just two points of shock; I had been hoping to kill the senior leader.

In their next phase the British doubled round the bend to avoid further fire and moved up their two leading carriers to the road junction.  The entire British force, less the carrier troop leader hanging back down the Route Nationale, can all be seen in this photo.


I felt it was still too early to deploy anything more as there were no good targeting opportunities on offer, the sunken road offering such good cover for the Tommies.  But they would have to come out sooner or later, wouldn't they?

And with their next two phases, courtesy of another a double phase, they did start to, but very cautiously; led of course by those accursed carriers.


The only opportunity here was for some very long-range fire by my off-table MMG against the section on the Route Nationale who were now only covered by well-maintained hedge lining it (minor obstacle / soft cover).   But again, John's handy CoC points saw them 'Hit the Dirt' and I failed to inflict even a single point of shock.  


The British, gaining in confidence, started to push forward their carrier section and the section on the road.


My inability to roll '5's with my command dice prevented activating the off-table MMG again, and my poorly placed JOPs didn't allow any deployment with a clear shot for my Pak 36, so there was no response from the Germans to all this.

So, as more smoke came down to shield them, the British carrier section pushed on as the prize of my unprotected JOPs, probably only a good flat-out move away from being shut down, beckoned.


It was now the last possible safe moment, so digging into my carefully hoarded CoC reserve, I played a CoC die to move the JOP nearest the carriers further away, and then used it to deploy the Pak 36 to take on the carriers approaching the wood.  

It fired; it missed!  Verdamt![5]

Needless to say, British retribution was swift in coming, with carriers and mortars engaging the Pak 36.  Despite 'Hitting the Dirt' and grovelling in the bottom of the gun pit (entrenchment) the Pak 36 suffered the loss of one gunner and two points of shock (the penny is the base of the dead crew member). 


John's carefully constructed, mutually supporting approach was paying dividends.

Nonetheless my junior leader stepped up to fill in for the lost gunner, remove a point of shock, and direct the gun to fire again.   


Another miss!  


I was pretty sure at this point that it was not going to be my day.

And, sure enough yet more pain was piled onto the hapless gun team as they again ate dirt.  And, they again lost another man and took another three shock leaving them on the brink of being pinned.

But the brave fellows hung on in, removed a point of shock, and tried what was probably going to be their last shot ... and you guessed it, they missed.

There was going to be no fourth chance as the British piled in everything they had to inflict another three shock and two dead.  This saw the team, well one man, and the junior leader, rout off the table.

The resulting 'Bad Things Happen' tests, for the team and junior leader routing off the table, saw my Force morale drop from10 to 7.  In my phase the off-table MMG firing again proved completely ineffective so in my following phase, I opted to withdraw from the table, albeit I had nothing on it at that point.  Forced to concede, and still in the first turn!

 
Post Mortem

There isn't too much to say on this one, as the Germans were always going to be up against it with only one anti-tank weapon against a swarm[6] of Bren Carriers.  Nonetheless, John had played a winning hand faultlessly.  He refused to get spooked by the absence of a German response, and his force deployment was a masterpiece of all-arms integration and co-operation.  Nothing was exposed unless absolutely necessary, and even then, only when his entire force was available in protected positions to provide overwhelming covering fire. 

After a string of wins, it seems I have finally had my come-uppance.

Notes:

[1.]  The mistake was in using the first patrol marker to place a JOP without considering where the other patrol markers would allow JOPs to be positioned.  The result being I used my most flexible patrol marker to place a JOP for which the others could've been used only to find they were very limited and didn't let me put them where desired.

[2.]  The third Bren carrier was equipped with a Boys anti-tank rifle (ATR) and came with a senior leader who could command the Carrier troop.

[3.]  As we had agreed that we would stick with the support lists in the campaign booklet, there were no replenishment points available, so this extra mortar was as much about having more ammunition on hand as being able to engage more targets.

 [4.]  I was hoping to build on my free CoC die (for achieving the objective in Scenario 1) and gain a significant CoC point advantage over my opponent.

[5.]  Double-verdamt, as I didn't realise at the time but I had forgotten to use the junior leader with the Pak 36 to increase the team's chance of a hit by using both his orders - something only available on deployment.  But my die throw was so low it wouldn't have helped against the small, low-profile, targets offered by the carriers. 

[6.]  Is that the correct collective noun for Bren Carriers?


Caesar's Camp - Scenario 2 - CoC AAR

Capturing Caesar's Camp, 3rd June 1940 - a pint-sized campaign 

This Chain of Command (CoC) game was played immediately after Scenario 2 (previous post), and in our haste to re-set the table and get started I forgot to take my usual pre-game photos of the table as set up.  But in good Blue Peter fashion, here's one we played earlier (as a one-off CoC v2 practise game).


The terrain,vehicles and figures, are all from my opponent, John's, 15mm collection.  And, as he even has the cornfield sections numbered as to where they go for this scenario, the changes between this set up and the one we just played are minimal.  Some of the buildings have changed as John has since acquired buildings better suited to the scenario - I'll leave it to the reader to spot any differences ...

Scenario 2 - 'The Seaforths at Trois Foetus'

This scenario (see map below) is a Flank Attack game with the attacking British (with French support) entering from the northern and eastern edges, and the Germans defending the south-western corner (the broken blue line indicates their deployment zone).


Rolling for Force Morale, I, as the Germans, again started on 11 while John's British managed a 10, one better than the last game.

The Patrol Phase

In this campaign scenario the Patrol Phase is modified such that, after the patrol phase, the Germans may place their Jump-off Points (JOPs) anywhere within the deployment regardless of where their patrol markers are.  I'm not sure what was intended by this change but it incentivised some very odd behaviour in the patrol phase.

Realising my patrol marker placement was irrelevant to my JOP placement I quickly advanced my patrol markers to get them shut down as quickly, and as close together as possible (we reckoned actually stacking or overlapping them was unreasonable).  This produced the following positioning of the patrol markers at the end of the patrol phase: for the German and the northern British patrols ...


... and the British eastern patrol markers, mostly on their starting positions.


The effect of this was to limit British JOP placement along a single narrow lane behind their patrol markers away from the cluster of German JOPs.  With no cover along most of these lanes, the four British JOPs (marked with yellow arrows) were largely confined to their table edges.


In contrast the scenario allows the Germans to place their three JOPS freely within the deployment zone, and I placed them as shown.


Next, it was time to select support options; the Germans with only 6 points of support simply opted for two tripod-mounted MG34s (MMGs) at 3 points each.  The scenario also provides the Germans with a free, 88mm, 'Bunker-buster' gun positioned off-table and firing through the western edge when activated using 2 CoC points.  The British, as attackers had 16 points of support and chose, but did not disclose: a pre-game barrage (2pts); two French Hotchkiss H39 tanks (3pts each); a Vickers MMG (4pts), a 2" mortar team (2pts); and, a sniper (2pts).  After this, it was down to the British, as attackers, to take the first phase.

The Game

The Brits opened the game by deploying a 2" mortar in the eastern wood ...


... and an H39 tank down the eastern road; the latter, largely, but not completely, hidden from the off-table '88' by the tall bank and dense hedge lining the road at this point.


This elicited no response from the Germans, so in their next phase the British deployed a senior leader (Snr Ldr) with the 2" mortar to maximise the chance of getting smoke when it was needed[1].  And, to put some pressure on the Germans from another direction, they deployed a section in the northern wood.

In the next German phase I again decided it was better to wait for John's men to expose themselves further before committing to deploying anything in response.  With the effects of the British pre-game barrage making any deployment uncertain it was going to be a risky judgement call on how much longer to wait.

The British now started to press in earnest, deploying a second section down the northern road alongside the cornfields ...


... and a second H39 tank behind the first.


The threatened advance from multiple directions now facing the Germans looked like this:


With my deployment uncertain, and the ever-present risk of a double-phase for the Brits, I decided it was time to act and threw my command dice ... 
and got three '5's and two '4's!

While the '5's were very welcome CoC points, I wasn't about to deploy a senior leader on his own without troops to command so any attempt at deployment would have to wait.  So, denied the ability to deploy any troops I decided to make some use of the CoC points I had been accumulating and engage the French tanks with my off-table '88'.  I had been waiting for them to fully expose themselves, but could wait no longer and opened up on the lead French tank which was only partially obscured by the tall hedgerow.  The result was most gratifying.


The British response was to immediately lay smoke to block the LOS from '88', which is traced through a point on the western edge of the table as nominated by the owning player when it first fires (I used a 'pinned' token to mark the spot, right at the north-west corner of the table).


Having my '88' blocked so easily was frustrating, but at least it took out a tank first and the resulting Bad Things Happen test saw the British Force Morale drop from 10 to 8.  How they felt about this was unknown, but seeming to take heart from my failure to deploy any troops they immediately started to press forward down the northern road by the hedges.  


John had tried this move in our previous gaming of this scenario and it hadn't turned out well; the scarecrow in the cornfield turned away as if unwilling to witness a repetition of previous bloody debacle.


The Germans in their phase, deciding to stick with what worked last time opted to deploy an MG34 (MMG) team and a senior leader, both managing to pass their deployment rolls.  

Faced with a repeating nightmare, John spent 3 CoC points to allow his men to 'Hit the Dirt' behind the hedge, effectively putting them in them hard cover.  

In reply my senior leader used all his orders to activate the German 'Maschinengewehr' characteristic.  The resulting fistful of dice, at close range, saw the cowering British section lashed with fire and taking a couple of casualties and shock.  But best of all, one of the casualties was the section leader and his wounding saw the British Force Morale drop from 8 to 6 (John was unfortunately destined to throw poorly on his Force Morale tests throughout the game). 

The British responded by dropping smoke in front of my MMG leaving me on tenterhooks wondering whether he would charge his section through the smoke to go in with the bayonet.  In the end he decided not to and focused on trying to rally the shock off the section; a slow process with their wounded leader reduced to just one order per phase.

All John's work was quickly undone as, in my next phase, I threw three '6's for a double phase and an end to the current turn.  

In the first phase, with the smoke still in place, there wasn't much I could do.  But when it was removed for the next phase it would open up the fields of fire for the '88' and the MMG so I was hoping for a good command roll in the next phase.  And yes, Jammy Jerry does it again, with two '6's for another double phase!

I didn't really make best use of the next two consecutive phases; just continuing to fire at the stranded section to pin them, wipe out a team or kill the section leader; none of which happened, albeit they were being slowly ground down.  

Then, after three consecutive German phases, when it was finally a British phase, insult was heaped onto injury as John rolled five, yes five, '4's!

All he could do with this, was to get his one deployed senior leader to direct the 2" mortar to again smother my MMG, but for the first time, they missed, their last smoke round landing 6" to the left and inconveniencing no-one.  This was starting to look like an extravagant use of a senior leader.


So, my phase again, and back to slaughtering the lonely section, and this time I did kill the section leader, and British Force Morale dropped from 6 to 5, just one away from losing a command die and starting the Ticking Clock to end the game.

In their phase, the British deployed a Vickers MMG to try and suppress my MG34, but as both were entrenched and at long range this was always likely to be an indecisive firefight.  


But, with further support from the section in the northern wood they were starting build up shock on the MG34 team, but with an attached senior leader that was going to be manageable.


Also, with their hand forced by the loss of the stranded section's junior leader, the last British senior leader deployed to try and rally them and bring them to safety.  BTW he's the furthest guy with the red dot on his base (yellow dots indicate junior leaders).


Was this just reinforcing failure?[2]  

Anyway, with the British on the ropes it was time to apply more pressure to get their morale down and start the Ticking Clock.  To achieve this a section was deployed into the cornfield to also fire at the beleaguered section, who were now close to being pinned.


As this German section was out in the open, the the British, in their phase, switched the Vickers to fire at them and, the French H39, which had been hiding behind the tall, dense hedgerow decided, in desperation, to advance flat out.


Being a small target, travelling flat out, it would harder to hit with my off-table '88'.  But again I again rolled a double phase.  This was lucky as my first shot missed the H39, but in the next phase it was hit and blew up.'


John, used up a CoC die at this point to avoid taking a Force Morale test for this.  It didn't help, as my continued firing at the pinned British section wiped out their Bren team and in the resulting morale test British Force Morale Dropped from 5 to 4 and started the Ticking Clock. 

Little of note occurred over the next four phases as the Ticking Clock ran down and the game continued into 'Sudden Death'.  This reasons for this lull were: I was happy to let the game run down; and, John was struggling to achieve much with only four command dice - It took him three attempts to deploy his last section as, with all his senior leaders deployed, they were hesitant about deploying. 

But, the following phase, before his last section could achieve anything I said, "What I need now is for you to roll two '6's and end the game, go on John".

And, he did!  Game over.

The Butcher's Bill

Not as bloody as you'd think.  

The Allies had lost two French tanks and the British lost eleven dead including a junior leader, but luckily for them this platoon plays no further role in the campaign.

The Germans, still with their starting Force Morale of 11, lost just three men (no leaders) of whom one is lost for the campaign and the other two will return after the next game.  So, this platoon is available only one man down for use in Scenario 5 if wished.  It won't be, as the platoon from Scenario 1 is also an option for that game and is available at full strength.


Next Scenario...

We still had time after this game to set the table for Scenario 3 as I have no gaming planned between now and John's return next week for another session.  So as a teaser here's a quick look at the next table.


Notes:

[1.]  The days of British 2" mortars relentlessly smothering the table-top with smoke are gone as v2, in place of their unlimited supply, only gives them 3 rounds of smoke.  

[2.]  CoC player may be wondering at this point why the British seem to be persisting in playing on with a losing hand.  That is easily explained by the fact that this platoon plays no further part in the campaign after this action so can be considered expendable.  Also, if the Germans win this scenario no French tanks may be selected as support for the rest of the campaign, so who wins the game matters, but for the British the cost is irrelevant.

Caesar's Camp - Scenario 1 - CoC AAR

Capturing Caesar's Camp, 3rd June 1940 - a pint-sized campaign 

Finally, after all our practise games and familiarisation with the new, 2nd Edition, Chain of Command rules, John and I finally kicked off our campaign for real.  As we were both politely offering each other the chance to choose sides, John's wife broke the deadlock by rolling a d6, and duly appointed John as the British commander (or should that be allies?) and me as the Boche.

Scenario 1 - 'Attack on Hedgehog Wood'

The first scenario, see map below, is a delaying action by the Germans.  


As I couldn't get far enough away from the table in my bijou cabinette to take a photo of the whole table from the British side, as in the map above, I had to settle for one taken from the right hand, or eastern, edge.  The knocked-out Dingo scout car can be seen in the bottom right of the photo - this was the scenario objective.

I don't know where the trees for the small copse (green felt template at bottom left of the photo) went when I took the photo but they were there when we started playing.  Anyway, the dice rolls for Force Morale saw the Germans supremely confident on 11, while the British were a little less sure of themselves on only 9.

Both sides needed to get possession of the Dingo ...


... 
to recover important papers left inside.  Possession of these papers gains either side a full CoC die at the start of Scenario 3, but the British are really up against it to get there before the Germans.

The Patrol Phase

As a result of the placement of the objective (Dingo), both sides concentrated their Patrol Phase activity along the road to get as close as possible to the scout car.  The Brits get 1-3 three moves before the patrol phase proper starts.  However, John threw a '1' and only got one move before the Germans, courtesy of their higher Force Morale started the patrol phase proper.  As a result, the British Jump Off Points (JOPs) were all clustered around where the road entered their table edge (note the copse now complete with trees!).


The German JOPs were strung out in a line, with two taking advantage of the hedges and one placed within deployment distance of the Dingo, courtesy of the scenario specific rule allowing the Germans to place one JOP anywhere in their deployment zone regardless of patrol marker locations.


Now, the question of what support to procure with my 8 points (the Brits get 12).  It seemed fairly obvious that the Brits would go for a Pre-Game Barrage as it represented their best chance to rush the objective before I could seize it; any such rush if successful would most likely also shut down my JOP placed near the objective so, what would I need to stop this?  MINES!


To be precise, I deployed two minefields (1pt each) around the wrecked Dingo which cut off any direct approach by the British, and also reduced the risk to my JOP (NB: the minefields do cover the road as well, it's just that I thought the templates looked better under the road).


With my remaining points I selected: an le.IG 18 7.5cm infantry gun with junior leader (Jnr Ldr) and five crew (4pts); and, two entrenchments for a single team (1pt each), for a grand total of 8 support points.  

In addition to their pre-game barrage (2pts), John, although unknown to me at the time, with his 12 points opted for: a Dingo scout car with junior leader (2pts); two carriers with a junior leader and 2-man Bren team (3pts each); and, 1x 2" mortar (2pts).

The Game

John as the attacker took the first phase and promptly rolled two '6's for a double phase!  That could've been really bad news if I hadn't opted for the minefields, but then I was surprised when instead of the expected Dingo scout car a pair of Bren Gun carriers appeared.  The next British command dice roll didn't allow John to do much (courtesy of a '6' and three '5's), other than deploying one of his platoon's senior leaders (Snr Ldr) into the copse.


Now it was my first phase, and unsurprisingly I chose to deploy a section with an entrenchment at the Dingo objective (the Rifle team in an entrenchment and the LMG team using the Dingo for cover).  What was more surprising was that, despite the pre-game barrage, the section deployed, tactically, without any trouble, as did one of my senior leaders, although the supporting 7.5cm infantry gun team didn't show up.


Another poor command roll saw John limited to cautiously advancing one his carriers to engage my section with their Bren.


Despite the hard cover provided by the Dingo wreck, they did manage to kill one of my LMG gunners but inflicted no shock.


Lacking a '1' in their command dice, to deploy their 7.5cm gun[1], the Germans thought it best to just sit tight, and tactical, in their hard cover.  Besides, spending a full, unpinned, phase in possession of the Dingo wreck would gain them the papers and the full CoC die for Scenario 3.  

With some better command dice, John, anxious to restore some momentum to his attack, deployed one of his infantry sections and a Dingo scout car that also opened fire with its Bren.  


In return I now fielded another section (with one entrenchment for the LMG team and the Rifle team taking cover behind a hedge to my right - no photo) who opened fire managing to kill one infantryman.  My 7.5cm gun also attempted to deploy but failed, again.  

In reply the Brits brought on a mortar team to lay some smoke blocking the line of sight (LOS) of my newly deployed section, while their armour continued to engage my first section by the Dingo, but only inflicted some shock (my senior leader was removing the shock as fast as the Brits could apply it).  The situation at this point is shown in the overview below (the yellow arrow indicates the edge of an entrenchment and a base of the second German section who are just off-camera).


The Brits now started a steady advance, supported by the deployment of another 2" mortar team, towards the German section by the Dingo wreck, firing as they went but frustratingly again failing to inflict any casualties.


The latest British advance had brought their Dingo within close range of the first German section so, after any shock had been rallied off, my LMG attempted to drive it off - it failed.  I also, FINALLY, managed to deploy the 7.5cm gun which attempted to target the infantry advancing in the open behind the armour killing one man but inflicting no shock.

John continued his advance firing as he went but again could only manage to inflict shock (we had some very odd rolls for casualties during this game).  At this point I realised[2] there was little to gain by fighting on because:

1. This scenario in the campaign is only fought once regardless of the outcome, and does not directly affect the overall campaign outcome.

2. I had already gained the objective (and free CoC die for Scenario 3) and if I went on to win the game all I would get would be the option to buy an off-table MMG in support of Scenario 3.  

3. I have the option of fielding this platoon in Scenario 5 in place of that which has to fight through Scenario 3-4.

So, as I'd only lost one 'dead' at this point, I ordered a withdrawal in my next phase.  The final position of this tightly constrained, but interesting, game is shown below (this time you can see where the second German section and 7.5 cm gun were deployed).


The Butcher's Bill

This was quite light with only 2 British casualties (irrelevant because this platoon does not feature again in the campaign) and one German casualty, who can be recovered in time for Scenario 5, which effectively gives me a fresh, replacement, platoon in my pocket for that game. 


Next Scenario...

This game having played through fairly quickly, we chat quite a lot of the time, allowed us to go on and play the next campaign scenario, 'The Seaforths at Trois Foetus'.  

The AAR for is being drafted and will be my next post ...


Notes:

[1.]  I had forgotten the gun came with a junior leader so I could deploy it on a '3' as well.

[2.]  To be fair, John actually asked me whether it worth me fighting on, after giving it some thought I could see his point and promptly acted on it.