[Pre-Cabinette Archives c.2007]
Recruiting the Armies
Some years ago, I picked up a second-hand copy of “CHARGE! or How to Play Wargames” by Brig P Young and Lt Col J P Lawford, published in 1967, some 40 years ago at the time of writing. For me the rules encapsulate a ‘golden age’[1] of wargaming where the focus was on fun, and historical accuracy came a very poor second.
Suitably inspired I cast around for old-fashioned wargame figures to match the ‘toy-solder’ style. I wanted to do the War of Austrian Succession (1740-48); ideally suited to the games described in 'CHARGE!'. It is also a period when the British, more often than not, lost to the French so results either way 'feel right', which may be why this war is less favoured than other 18th century conflicts.
I started with Spencer Smith Miniatures (SSMs), who also marketed the Willie and Tradition ranges, all of which feature in 'CHARGE!'. The Willie figures are beautiful, being (IMO) better proportioned than many of the ‘chunkier’ ranges of figures that dominate the market today.
While lovely, the Willie range was too limited to build a representative force and, more importantly, the detail on the figures demands a better paint job than I could manage. Tradition figures didn't suit me, seeming too wooden, and the SSM figures, now cast in metal as opposed to the original plastic, while appealing didn’t capture the voluminous appearance of the cuffs and coattails that I associate with the period.
Seeking more options, I bought some 42mm figures from Irregular Miniatures, both Seven Years War and Marlburian, but again found them not to my taste. I toyed with switching period and bought some of the Deutsche-Homage' 42mm Franco-Prussian War (FPW) figures just because they captured a delightful old-fashioned tin soldier look (and were easy to paint).
Unfortunately, the bigger scale, together with the improved FPW weapons, made the firing ranges in the rules look very wrong; and the limited size of my wargames table wouldn’t accommodate an increase in firing ranges. Frustrated I returned to the Spencer Smith figures, and tried some Green-Stuff to bulk out their hats and coats, which seemed to match the 'toy' look I was after.
Clearly, modifying every figure in this way was impractical, so I asked Peter Johnstone of SSM if he would cast figures using these as masters. Peter was more than helpful and the initial results gave me the confidence to press on with what became the SSM WAS range.
Now, having started a project, comes, for me, the difficult bit, painting the figures. For once I avoided the usual pitfall of buying a mass of castings that never seems to shrink no matter how many are painted and only bought enough figures to replay the first example game in 'CHARGE!', namely the Battle of Blasthof Heath.
Having got the 'armies', the next step was to build some simple terrain. I wanted the terrain to match the look of the original but without going so far as to use a Tradition catalogue to represent a hill! The buildings and bridge were free to download paper models from the Internet printed out and pasted onto foamboard. The hill was a slab of polystyrene coated with newspaper and PVA glue, while the river was cut from old cereal packets with the banks carved from self-adhesive cork tiles. With all now in place, I invited my friend Steve to come round and put the project to the acid test of battle.
The Battle
The Battle of Blasthof Heath is used to illustrate the mechanisms in the basic rules which I used in the game (the book also includes an advanced set of rules with another larger game to illustrate their workings, but that's another story). The basic rules are a genuine “back of a postcard” set, with players taking alternate turns to freely move and fire their figures without any command and control restraints, the game being won as soon as one side loses more than half its figures. Figures are moved individually, infantry and guns up to 6” and cavalry 12”, and firing and combat is decided by fairly simple dice throwing mechanisms.
The scenario is a fictional contest between the ‘Elector’ and the ‘Emperor’, in which the forces of the former having been defeated are seeking to prevent the advancing Imperial army from seizing a bridge over the River Blast. The Electoral rearguard under General Soubise has to either destroy the bridge[2] or, hold it until nightfall[3] against the advance guard of the Imperial forces under Count von Kornberg. The forces available to the two commanders (and their 50% defeat thresholds) are listed below (I/D/CR = infantry/dragoon/cuirassier regiment):
Electoral Rearguard
Soubise & ADC
Hohenzollern DR 1 officer & 12 troopers
Max Josef IR 3 officers & 40 soldiers
Field Artillery 2 guns, 1 officer & 10 gunners
TOTAL 69 figures (50% = 35 figures)
Imperial Advance Guard
von Kornberg & ADC
Birkenfeld CR 2 officers & 16 troopers
Hoch und Deutschmeister IR 2 officers & 32 soldiers
Field Artillery 2 guns, 1 officer & 10 gunners
TOTAL 65 figures (50% = 33 figures)
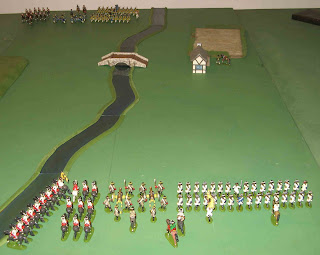
The armies were deployed as per the original game as shown
in the map and photo of the armies in their starting positions below:
The Imperial forces starting 24” from the nearest point of the bridge.
The Electoral forces starting a little closer; 24” would take them to the far end of the bridge.
From here on everything was left up to chance or the skill of the opposing commanders. Soubise won the toss, as per the original encounter in the book which he had then gone on to win, an ominous omen for von Kornberg.
Turn 1
Soubise elected to move first, and the Electoral troops stepped out smartly towards the bridge appearing to reject any subtle manoeuvring in favour of the direct approach, with half of their infantry moving as if to cross the river.
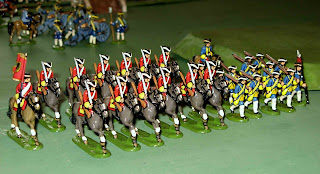
In reply von Kornberg led all his cuirassiers across the river, determined not repeat the error from the published encounter where he divided his cavalry either side of the river and squandering his superiority in that arm. Simultaneously the Imperial infantry and guns advanced towards the bridge, an impressive, and impassive, wall of white.
Turn 2
Soubise’s infantry left wing, reinforced from the right,
pressed on to ford the river, a volunteer being sent ahead to confirm the
feasibility of the ford[4].
The infantry right wing and the cannons continued their advance to the bridge but the Hohenzollern dragoons to their left slowed their pace, only inching forward; as if unwilling to go it alone without infantry support.
As Electoral right wing hesitated von Kornberg sent his cavalry out on a sweep designed to pass around the hill and seek out the enemy flank as the Imperial infantry and guns continued their inexorable advance.
Turn 3
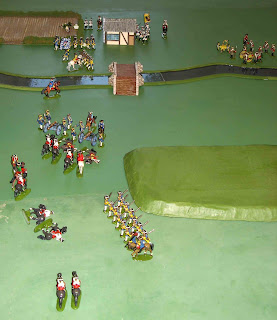
The Electoral infantry forded the river, its slippery banks causing them to fall into some disorder as they did so[5]. The remaining infantry and artillery continued to close on the bridge. The dragoons however, faltered at the sight of the Imperial cuirassiers and did not budge an inch. ‘Aha’ cried von Kornberg, ‘I see your fellows have lost their appetite for a fight!’ ‘Oh no’, retorted Soubise, ‘I’d just forgotten to move them, thanks for reminding me.’ As von Kornberg cursed under his breath the Hohenzollern dragoons, somewhat unconvincingly, edged forward.
As the Imperial cavalry continued their sweep von
Kornberg noticed his artillery had halted while his infantry marched on.
Leaving his ADC to ensure the cavalry stuck to the plan, von Kornberg galloped back to determine why the artillery had deviated from it. As he splashed across the river his artillery opened fire on the Electoral infantry but at long range achieved nothing[6].
Turn 4
On the Electoral right flank, the dragoons continued to
dither as Soubise diverted the right wing of the Max Josef regiment to bolster
his increasingly nervous cavalry. On the left flank the remainder of the
Max Josef regiment managed to regain some order on emerging from the river, albeit in an unconventional 3-deep formation.
In the centre the Electoral guns opened fire on the Imperial guns but missed, prompting von Kornberg to claim he had deliberately opened fire too early last turn in order to lure Soubise into doing likewise.
The Imperial cavalry continued their wide sweep around
the Electoral flank finally bringing themselves within charging distance while,
as intended, avoiding the Electoral infantry.
The Imperial guns, now under von Kornberg’s direct supervision, limbered up and moved forward to catch up with the Deutschmeister regiment as it wheeled left to align its line of advance with the bridge.
Turn 5
The Electoral advance seemed to falter with the infantry on their left halting, while their dragoons edged backwards away from the Imperial cuirassiers. This left only the right wing of the Max Josef regiment going forward as moved to support the Hohenzollern dragoons. Despite this timidness, the fates smiled kindly on the Electoral forces; their guns managing two hits on the Imperial battery which killed a crewman and destroyed a cannon giving them the upper hand in the ongoing artillery duel. (Losses, Empire:Electorate = 1:0)
Eager to press on, von Kornberg’s ADC, while swinging wide to avoid the enemy infantry, brought the cuirassiers, once more, into charge reach of the Electoral dragoons.
The remaining Imperial artillery piece returned fire against the Electoral guns but missed, much to von Kornberg’s annoyance, who, undaunted, continued to advance his infantry to bring the bridge within musket range.
Turn 6
Feeling confident that his cavalry flanking force would soon
start to press its advantage, von Kornberg offered Soubise a chance to
surrender, but was ignored. Soubise inched forward the left wing of the
Max Josef regiment seeking to avoid leaving their flanks uncovered, even when the Imperial cavalry was nowhere in sight.
Similarly, the dragoons on the Electoral right fell back
once again to line up alongside their advancing infantry who had formed line in anticipation of an Imperial attack.
In the centre the Electoral battery now confident in its numerical superiority switched targets to engage the Imperial infantry inflicting 2 casualties. (3:0)
Seeing his infantry fired on by artillery and unable to reply, von Kornberg felt compelled to press his infantry forward to engage their opposite numbers before too many were lost to artillery fire. The miserable performance of his remaining cannon, firing at and missing the enemy’s battery, only confirmed his decision to limit his troops exposure to the enemy guns. Meanwhile, the ADC leading the cuirassiers, aware that pressure was building in the centre, gave up trying to engineer an engagement against the enemy’s cavalry while avoiding his infantry and charged in (to fight a mêlée in the opponent's bound next turn).
Turn 7
As the advancing Imperial infantry advanced, the Electoral
infantry at the bridge now added their fire to that of their artillery, both
infantry and guns each killing three reducing the front rank of the Deutschmeister regiment to a bloody ruin.
On their right flank the Electoral infantry was equally
successful shooting down two of the charging cuirassiers and holding the other
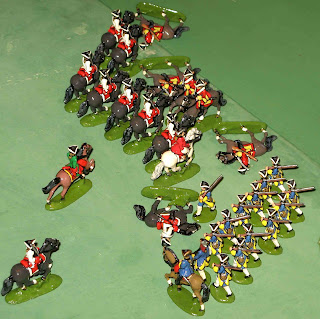
three that charged home to a draw. However, the dragoons, who managed to kill two cuirassiers, lost three of their own number. (13:3)
The Imperial rejoinder saw the cuirassiers rebuffed by the infantry returning to the fray with their more successful comrades who had
bested the dragoons. Then the Imperial artillery succeeded in finding the range
of the Electoral guns and killed two crewmen.
Finally, the Imperial infantry stationed between Blasthof farm and the
river fired back killing four infantrymen while sending a detachment around the
farm to flank the enemy. (13:9)
Turn 8
The Electoral infantry wheeled a section to counter the Imperial flanking move while the reminder continued the fire fight
against the infantry to their front inflicting three and half casualties.
These losses, added to another two and half casualties from the artillery, gave a total of six dead, which saw the remains of the Deutschmeister front rank
swept away.
On the Electoral right flank things were going less well as
the dragoons were once again engaged with the cuirassiers. In contrast, the Max Josef
infantry continued to shine, shooting down another two enemy cavalry, killing one in close combat, and
holding off another for no loss.
The decision by the Imperial ADC to risk engaging both the infantry and the cavalry was beginning to look like a serious error. Despite this, the cuirassiers maintained their ascendancy over the dragoons killing three, including their officer, while only losing one in return. (23:12)
The Imperial cuirassiers sensing victory over the enemy dragoons charged in for the third time against the dragoons while seeking to avoid contact with the somewhat more lethal enemy infantry; only one being contacted. Away from the cavalry combat the Imperial artillery reverted to its old habits and failed to register a hit, while the musketry from both elements of the Imperial infantry inflicted a total of five casualties on their Electoral opponents. These successes, however, were starting to look like too little too late. Von Kornberg sensed that his force could take many more casualties without breaking. (23:17)
Turn 9
The cavalry combat was beginning to draw to a close as the dragoons
clearly had enough with some of their unengaged figures not rejoining the
fight. The supporting infantry also disengaged and reformed to bring its muskets to bear on the cuirassiers, although in doing so they left behind the lone
musketeer caught up in the cavalry mêlée. This musketeer,
a veteran of two rounds of combat with two cuirassiers already to his
credit, was undaunted; when his shot failed bring down his opponent, he simply
applied the bayonet to notch up his third kill[7].
The dragoons failed to follow his example losing three men
to the cuirassiers for no return.
Meanwhile the Electoral artillery and infantry continued to
take their toll on the Imperial infantry killing a further three each. (30:20)
The writing on the wall was now clear for all to see as the remains of the main body of the Imperial infantry were forced to seek cover behind Blasthof farm. They were compelled to do this as, with their front rank annihilated, they had found their rear rank out of range and to advance further would have seen them gunned down whilst unable to reply[8].
Meanwhile, the
flanking detachment, left to continue the fire fight alone, only managed to kill
two while the remaining cannon, still firing at the enemy artillery, killed another
crewman. The cuirassiers, despite finally breaking through to threaten the
Electoral artillery, also appeared to be running out of steam only eliminating a
single dragon, albeit for no loss. (30:23)
Turn 10
With no infantry left to engage, the Electoral guns were swung round to face the cuirassiers to their rear. This proved an unnecessary precaution as this menace was swiftly eliminated by a crisp volley from the Max Josef regiment; sweeping two more cuirassiers into oblivion and bringing the regiments total for the action to eight cuirassiers without loss!
With the Imperial forces clearly having shot their bolt even
the surviving dragoons showed some enterprise with one attempting to capture
von Kornberg’s ADC.
As the Imperial flanking assault collapsed in disarray, the Max Josef infantry by the farm applied the coup de grâce killing another three Imperial infantry.
The Imperial losses now totalled 35 and exceeded the half
the original force, at which point they broke and fled from the field.
Soubise congratulated himself on his win and turned to destroy the bridge before the main Imperial army arrived. (35:23)
As a postscript to the action there was still an ongoing mêlée in progress between a solitary dragoon and von Kornberg’s ADC. This action was rapidly resolved in the ADC’s favour and he galloped off as the dragon toppled to the ground, but the ADC may have escaped the frying pan only to fall into the fire, as the scapegoat for von Kornberg’s failure. (35:24)
Post Mortem
With drinks in hand the outcome of the game was dissected, the primary cause of the Electoral victory being the astounding performance of the right wing of the Max Josef Infantry Regiment who repeatedly saw off all their opponents without losing so much as a single figure. While it was agreed that von Kornberg had been unlucky, the vagaries of the dice simply added to the enjoyment and both parties agreed it had been great fun. The true worth of the game is that it inspired me to keep painting with a view to trying out the advanced rules and possibly even setting up a simple campaign.
I hope anyone who has read this far will have enjoyed the
account as much as I enjoy reading those in 'CHARGE!' and is perhaps inspired
to indulge in some 'Old-School' gaming.
Endnotes:
[1] In reality
I suspect that the games of my youth weren’t any better, but being young was!
[2] Requiring both
ends to be held for 6 uninterrupted moves.
[3] Nightfall would
arrive at the end of move 15.
[4] Actually,
the figure was a marker for the front rank who refused to stand up on the edge
of the riverbank.
[5] Again,
caused by the tendency of individually based figures to topple on terrain
features.
[6] It has been
rumoured by some that the real reason the artillery opened fire was that von
Kornberg had forgotten that artillery range in the basic rules is half that in
the advanced rules but sought to save face by blaming his unfortunate artillery
commander for opening fire too soon.
[7] This
particular musketeer (figure) has been recognised for his outstanding combat
performance (the final combat victory requiring a 6:1 score on the dice), with
a field promotion to NCO. As a result, his hat lace will be upgraded
(re-painted) to silver lace.
[8] In the
basic rules infantry either move or fire, not both.


.jpg)


Well now doesn't this bring back pleasant memories of a lovely battle by email using your SSM. When do we get to do that again? I really do enjoy the toy soldier look you have captured with these and the games, in my limited experience, are a treat. Keep up the posting!
ReplyDeleteYou're right, I should do another PBEM now I have a permanent set up, although I was very kindly allowed to takeover the dining table for about 10 days or so for the last one.
ReplyDeleteMarvellous stuff Rob…
ReplyDeleteAn enjoyable sounding game…
And very evocative pictures of beautifully painted miniatures…
All the best. Aly
I have a store of articles like this I've written for others that are no longer accessible so no doubt I'll heavily lean on them to keep the post rate up for a bit.
DeleteAh! Now, the other penny has dropped, Rob! Please forgive me. A dulled brain resulting from too much roasted goose the last few evenings. Your Spencer Smiths are some of the nicest around and really capture that old school ethos, and it was great fun to revisit this archived post. Did you shut down your earlier blog/website? IN any case, it's good to see you back at it.
ReplyDeleteKind Christmas Week Regards,
Stokes
I've never blogged, or had a website, before. You probably saw this article when it was first posted on the Spencer Smith website when Peter Johnstone sold them (the moulds have now migrated to the States - Wee Wolf Miniatures, and are, so I'm told, going back into production in the new year).
Delete