From the German 'Kabinettskriege' - Cabinet Wars: a period of limited conflict from the Peace of Westphalia (1648) to the French Revolution (1789).

Half a Hex, Half a Hex, Half a Hexon-ward

Using hexes for movement has the advantage of removing any fiddly measurements to determine what moves our table-top units can, or cannot, perform on the table-top.  Converting wargames rules to use hexes does require a number of choices to be made and when it comes to unit facing I for one am firmly in the ‘face the vertex’ camp as shown in the diagram below.  Facing the vertex as opposed to the ‘flat’ works well for defining frontal arcs, flank and rear zones but means forward movement follows a zig-zag course with units staggering forward like drunkards.  


One of the rule-sets I have re-jigged to work on hexes is DBM using 15mm figures on 4cm wide bases, which gives two elements side by side in the 10cm-wide Hexon tiles that I use.  One day while wrestling with zig-zagging units my opponent, Martin, pointed out that as elements only occupy half a hex why not let them move straight ahead, elements in the right-hand side of the hex advancing into the left-hand side of the hex ahead (see diagram below).  The simple elegance of this solution was immediately apparent and why I had been unable to see it before escapes me – sometimes it can be hard to see beyond customary practice.


I think this system works well but clearly, it’s dependent on relative unit/element width and hex size.  However, 4cm is a fairly standard 15mm base width and Hexon is one of the more common systems (I have no connection with the company that makes it).  I doubt this has not been thought of before but I haven’t seen it being used elsewhere so thought I’d share it.


Old & New Games - Day 2 of 2

 On the second day, we were joined by George, and the four of us engaged in some 'Old-School' nostalgia with Spencer Smith armies fighting it out with a trimmed down version of Brigadier Peter Young's 'Charge!' rules.


The Battle of "Lobositz-ish"

The scenario was very loosely based on the battle of Lobositz with a better quality 'Prussian'[1] army (Martin and Steve) attacking a larger 'Austrian' army (George and me) defending a strong position (the town and a sunken road represented by a hedge).  The starting positions are shown below - not a great photo as my cabin's not big enough to get far enough away from the table and my camera is a bit past it.


Also, to stop the low sun coming through the windows and throwing sharp bands of light across the table the red blinds were drawn which accounts for the rosy glow in many of the photos, luckily not in the closer shots of the 'Prussians'...


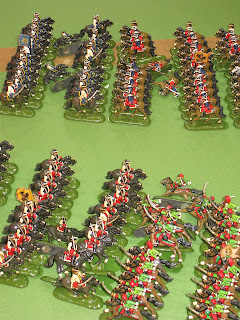
...and Austrians.


The battle opened with the cavalry on both sides advancing to take control of the open part of the battlefield away from the town.  


The Prussians suffering from the attentions of the Austrian guns, courtesy of George's first dice roll of the game being a double-six!


The next turn saw a massive cavalry mêlée in which the Austrian dragoons and hussars came off second-best against the Prussian cuirassiers. 


At the other end of the field a mass of redcoats formed up and started off to assault the Austrians defending the sunken road (hedge)... 


...and the Croats started to harass the Prussian grenadiers.


Subsequent turns saw the Prussian cavalry turning on the infantry protecting my battery.


Elsewhere, both sides were beginning to rue their actions as the massed Prussian redcoats continued their advance leaving a trail of dead and dying in their wake...


...and the Croats found, to their cost, that harassing grenadiers can be a dangerous occupation.


The casualties among the redcoats proved unsustainable and with the Austrian cavalry staging a bit of comeback the Prussians used their last intact cavalry regiment to eliminate George's battery that had inflicted huge losses.


With time pressing and Martin and Steve feeling a further Prussian infantry assault against the Austrians defending the town would be futile they accepted defeat, shook hands and called it a day.


So, just time for a quick photo call for the commanders, starting with the winning Austrian C-in-C, George, ...


...his second in command, me, ...


the Prussian commander in chief, surveying the cost, Martin, and...


...his second in command, Steve.


The game was enjoyable, but the strength of the Austrian position was really too much for the smaller but better quality Prussian force; a useful lesson for future games.  I also got more ideas for further streamlining the 'Charge!' rules for my next gaming session - a Charles Grant Tabletop Teaser, 'Advance Guard' from the June '78 issue of 'Battle' magazine.

Notes:

1. Actually, a mongrel collection of British, Bavarian, Hanoverian, Hessian, etc. as my collection, for the War of the Austrian Succession, contains no Prussians.

Old & New Games - Day 1 of 2

I've spent the last two days gaming with three friends who came round to my cabin for some miniature action.  

On the first day, three of us refought the Battle of Barnet Chit game, described in an earlier post (13-Oct).  This was followed by a quick gunfight using the Too Fat Lardies' (TFL) 'What a Cowboy' rules after which we set up for the following day's game and adjourned to the pub - Hic!


Battle of Barnet, 1471 - DBM

The Barnet game, using DBM rules modified to work on a hex grid, started with the Yorkists (nearest the camera), groping their way through the fog.


When they bumped into the Lancastrians, they found their right wing (Gloucester) was overlapped while their left wing (Hastings) returned the compliment to the Lancastrian right.  The photo below shows how Hastings' troops had gained a free pass to outflank the Oxford's command on the Lancastrian - indicated by the yellow arrows. 


Before the Lancastrian's could respond - courtesy of the randomised turn sequence - Edward IV's battle, which he led in person, slammed into Montague's command in the centre of the Lancastrian line and started to wreak havoc over several turns.  


Warwick, the Lancastrian commander, faced further setbacks as Gloucester, throwing some excellent dice, inflicted several unexpected losses on Exeter's command largely negating the Lancastrian advantage on that wing.  Warwick valiantly tried to shore up both wings by feeding forward troops from his reserve but was thwarted by a lack of PIPs and a capricious random turn sequence.  The inevitable sequel to all this was the collapse of both Lancastrian wings and the subsequent flight of the Nevilles in the centre.  So, this time the Yorkists managed reverse the result from the last time we played this game.  


A Fistful of Dice - What a Cowboy

After packing away the Barnet troops and terrain, we moved on to play our first game of What a Cowboy using some old Foundry figures and my nearly completed Wild West town.  Unfortunately, I don't have a decent mat to place on this so we made do with a sand-coloured length of cloth.


The scenario was based on 'A Fistful of Dollars' with two gangs trying to run the town while a mysterious stranger tries to play off both sides against each other.  As my first game with these rules, I got well and truly sucked into the game and forgot to take photos.  The game started well for my gang and our opposition was soon pretty much down and out and the 'Clint' character kept in check.  Unfortunately, Steve, playing Clint, made his move but was embarrassed by a steak of poor dice.  My mirth was short-lived when some bystanders (non-player characters) who the scenario allowed to back him up had no such problem and my gunmen came to a sad end...


Day 2 to follow later...