From the German 'Kabinettskriege' - Cabinet Wars: a period of limited conflict from the Peace of Westphalia (1648) to the French Revolution (1789).
Showing posts sorted by relevance for query tercios. Sort by date Show all posts

The Armada Has Landed!

Someone must've invented time travel and messed up the history books[1] as, with the English fleet prevented from sailing by a contrary wind, the Armada has put ashore a force under Don Alonso to try and take Portsmouth from the rear.  John, Lord Bawdesley has rounded up a scratch force and occupied a blocking position to save the fleet.  

The armies faced off against each other, the Spanish convinced their greater military experience and expertise would triumph, and the English confident that pluck and patriotism would be enough to see off the Dons.


The armies were broadly similar:

The English Army:
4x Battles with pike, bill, musket, arquebus and bow
2x squadrons of demi-lance with lance
2x troops of border staves (light horse)
2x medium guns (dug-in behind earthworks)

The Spanish Army:
1x large, veteran Tercio with pike, sword & buckler, musket and arquebus
3x Tercios with pike, musket and arquebus
2x squadrons of cuirassier (mercenary)
2x troops of petronels (arquebus) 
2x medium guns
  
The veteran Tercio should give the Spanish the edge, and they were clearly going to use it, aiming it at the English centre.


The English Battles facing them, while the equal of the non-veteran Tercios, were clearly up against it.


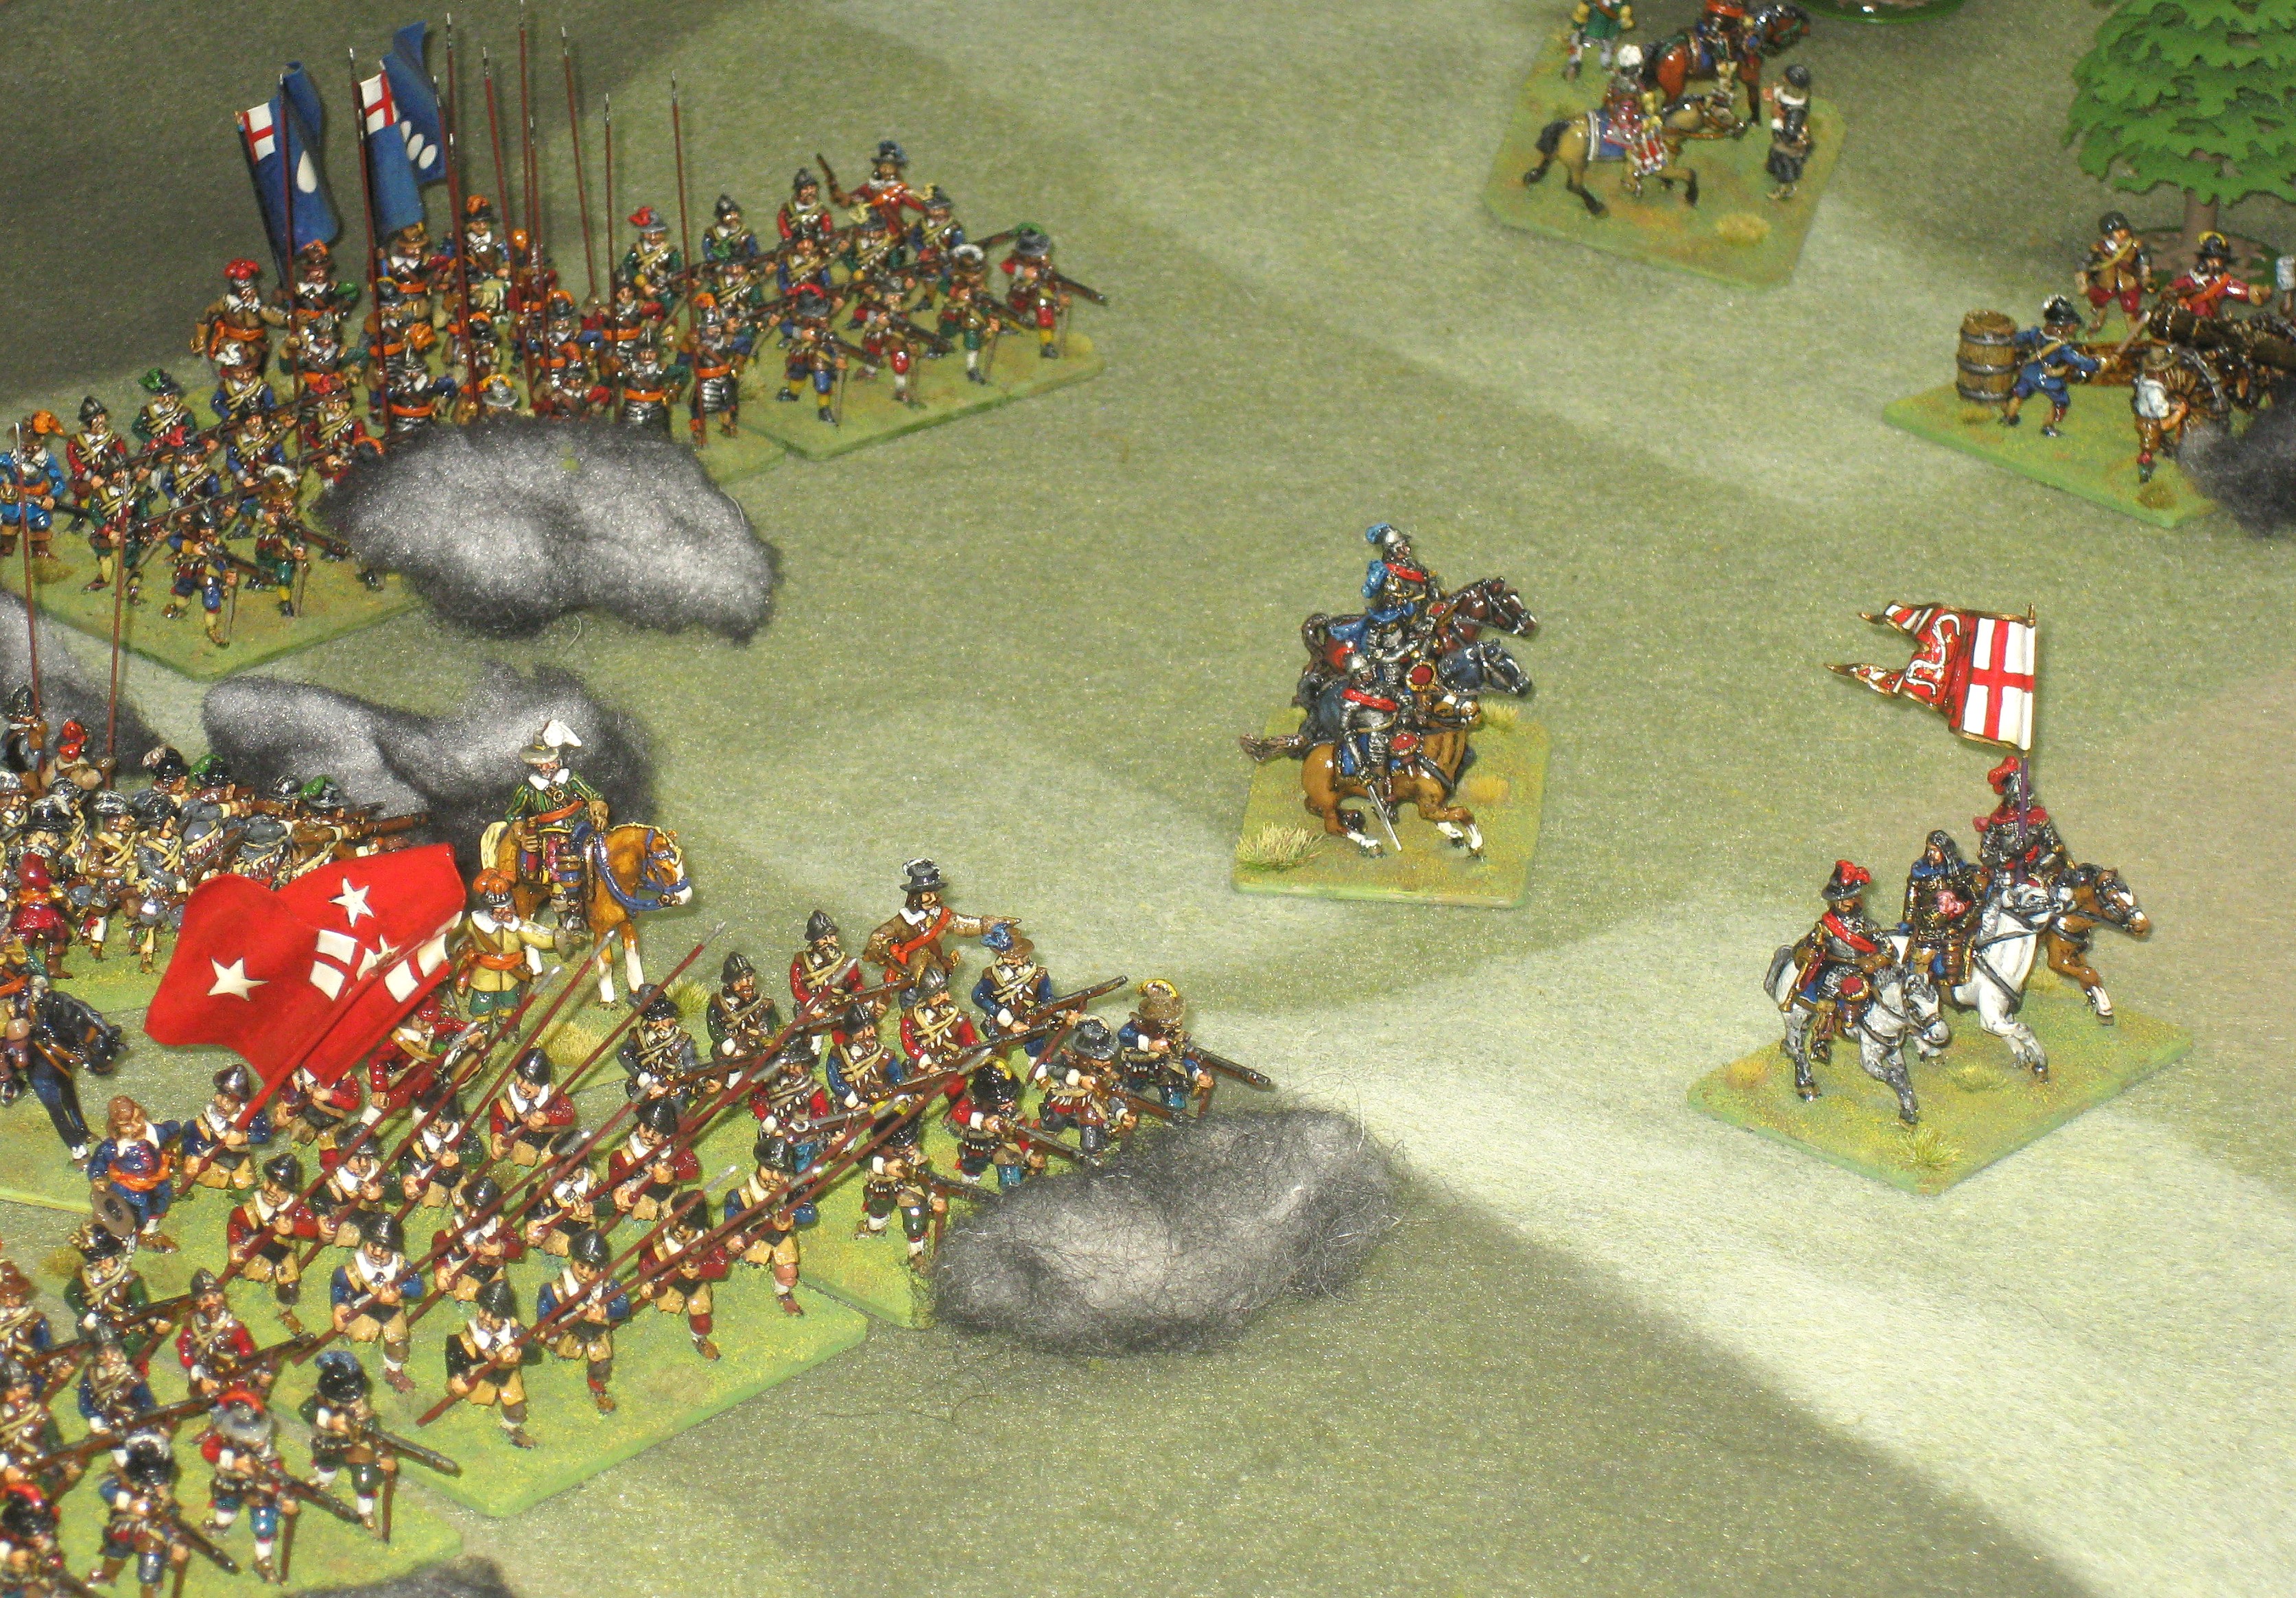
Both sides had deployed most of their horse at the eastern end of their lines: the English with both demi-lance squadrons and a troop of border horse; and the Spanish (shown below) with two troops of petronels and one of mercenary cuirassiers.


With deployment complete we rolled average dice to determine our generals' ratings.  The English ended up with two level-3 generals and one level-2 ...

John, Lord Bawdesley the English C-in-C (level-3)

 .. the Spanish did slightly worse with only one level-3 and two level-1 generals. 

Don Alonso the Spanish C-in-C (level-3) aghast at the quality of his subordinates!

Both C-in-C's took command of the main body in the centre, leaving their subordinates to command the wings.  And so, let the game begin.

Turn 1: and the English won the D6 roll-off for initiative, but chose to let the Spanish take the first activation[2].  The Spanish started quite conventionally, with their artillery bombarding the opposition, a move followed by the English.

After this, ineffective, preliminary bombardment the Spanish Tercios advanced at the run, first with their centre ...


... and then on their right towards Windmill Hill.


The English infantry contented themselves with advancing their foot to the forward slopes of the occupied hills.  Then they launched both demi-lance units on their right flank in a charge at the Spanish horse who, unfortunately had not, as the English anticipated, advanced and the demi-lances' charge came up short.


To rub in their misfortune the Spanish petronel units reacted by firing at them but without effect.

Turn 2: the English won the initiative, and again ceded the first turn to the Spanish.  The Spanish led off by activating a petronel unit to fire again at the demi-lances before they could charge again.  But again, the firing dice did not live up to expectation.


The demi-lances were unamused and promptly charged the offending petronels, soundly beating them 2-0 (hits or 'wear' inflicted - red markers) in the mêlée but didn't break them.  The petronels forced to fall-back ('disengage') were unable to complete their recoil owing to the cuirassiers behind, taking another point of wear in consequence.  They also became weary (yellow marker) as they had the maximum level of wear ('stamina' level) they could take before having to test for routing ('break check').


The cavalry battle then petered out with nothing more of consequence occurring in this turn.  

But elsewhere, the Spanish centre continued their rush to engage the English infantry as quickly as possible, the English only responding with some ineffective long-range archery.


The Spanish had left one Tercio behind on their left flank, by the wood at the top-left of the above image.  This was intended as reserve cum flank guard until the intent of the English cavalry and rightmost Battle were clearer.  They are also safe from artillery fire behind a small hill.

Turn 3: and the English, having won the initiative, chose to take the first activation.  Their focus was on the cavalry fight on their right but this was a dice disaster with units failing activate (owing to wear taken) and suffering more wear from the Petronels' firing.


As ever the Spanish main effort was to get their Tercios into combat, the first to charge being the large, veteran Tercio.  To their discomfort the English held them to a draw!  The Spanish then invoked the 'Bad War' rule that allows another round of combat in the event of draw between pike-armed units, they also gain an advantage in a second round from their sword and buckler armed troops.  The second round saw the English shamefully defeated and forced to retreat.


The next Spanish Tercio didn't need two chances, defeating their opponents in the first round.  The English centre seemed to be falling apart with two battles in full retreat from the victorious Tercios.


On Windmill Hill, on the eastern flank, there was finally some good news for the English as their battle charged down the hill to defeat the Tercio on that flank, but not decisively.

An overview at the end of Turn 3 is shown below.


Turn 4: and the English with the initiative took the first activation, ordering their victorious Battle to try and finish off the defeated Tercio.


But once again the dice desert the English and the Tercio wins outright, driving off the English in a shameful retreat, although they managed to survive the 'Break Test'[3] from their excess wear (above their 'stamina' level, 4).


The cavalry fight remained indecisive, but the English moved their border stave troop towards their beleaguered centre, where the last two unengaged foot units were now closing on each other.


In the centre the victorious Tercios advanced at the run to get to grips with the defeated English Battles before they could reform and recover.


Turn 5: and the Spanish finally manage to win the initiative.  They put it to work in the cavalry combat, but the petronel shooting proves indecisive.  The English response sees a demi-lance squadron charge the petronels who evade leaving the demi-lances to collide with the cuirassiers in the Spanish second line.  Both units are broken in this combat as they both fail 'break tests'[4] - the cuirassiers, unlike the demi-lances, have for some reason not been posed as routing in the photo below.


This saw the eastern flank considerably thinned out, prompting the English to move the border horse back to support the remaining demi-lance squadron (see top-left of photo below).


Beyond the cavalry fight the latest clash between Tercio and Battle had again gone decisively in favour of the invaders - the English can be seen retreating in the top-left of the image below.


Elsewhere in the centre the veteran Tercio stumbled and was defeated and forced to disengage by the rallied English Battle.


On the western flank the Tercio followed up the retreating English Battle. 


Also seen in the above are the Spanish cuirassiers and border horse who skirmished ineffectively with each other throughout the battle, hence have been largely ignored in this report.

Turn 6: and the Spanish had the initiative which they put into immediate effect by rallying most of the wear from the veteran Tercio.  The English had assumed the opposing English Battle was about to be charged by this Tercio so had given it 'Assault' orders that would allow it to counter-charge.  This unfortunately meant the 'weary' English Battle was now committed to charge in against a nearly fresh veteran Tercio.  The result was disaster as the Battle broke and fled the field.


The Spanish then charged right flank Tercio up Windmill Hill and broke the Battle there as well.


Although the other two Battles survived this turn, one even defeating the opposing Tercio, and the demi-lances finally managed to destroy a petronel troop ...  ...


... 
it was too little, too late and the balance sheet of losses at the end of the turn showed the Spanish had scored a Decisive victory.

History had been turned on its head!


Notes:

[1.]  Actually, this was just a throw down game using John's Spanish and English renaissance armies to allow him to try out the Liber Militum Tercios rules which he had not played before.

[2.]  Activation of units alternates between the two side until all units with orders have been activated.  All units are assigned a face-down order card at the beginning of the turn, these are one of the following: 'Run', 'Assault', 'Shoot', 'Ready' or 'Resist'.

[3.]  If a unite receives more 'wear' (hits) than its 'stamina' level it must test to see if routs (removed from the table as lost).

[4.]  Actually, the cuirassiers are a 'mercenary' unit and thus never take break tests as they automatically leave the field if their wear ever exceeds their 'stamina' level.

Old Toys - New Rules

A quick post on my latest game, mainly because I haven't yet posted anything on my ECW collection and they are, IMO, my prettiest army.  The troops are mostly old figures (mainly Hinchliffe) but the rules have been around for a few years, and they are, Liber Militum Tercios:


I have played these rules quite a bit, but always with a Martin's 15mm Thirty Years War collection.  The new bit this time, was using my 25mm ECW armies as a vehicle to allow Simon, who had never played them, to try them out.  As a learning game the armies were set up facing each other across a fairly open table, Parliament on the left and Royalists on the right.


Parliament was commanded by Earl of Essex (Simon).


The Royalists were commanded by His Majesty King Charles (me).


Tercios requires the players to place an order card face down next to each unit at the start of every game turn.  Then after dicing for initiative (who goes first), take it in turns to activate a unit to carry out its order; this is automatic when the unit is fresh (has taken no hits or 'wear' in Tercios terminology) but otherwise has to be diced for against the unit's discipline rating.  The orders restrict what a unit may do, provide bonuses or penalties for some actions, and how it may respond if attacked - these bonuses and reaction options are indicated on the cards.


Turn 1: the larger cavalry wings in the more open terrain (Royalist right and Parliament left), both advanced rapidly ('Run' orders).  They stopped 3" apart (the closest that enemy can be approached without 'Assault' orders) ...


... with Rupert's Horse leading the advance for the Royalist right wing.


The rest of the troops on both sides advanced more cautiously, presumably awaiting the outcome of the cavalry engagement before committing themselves.
 

Turn 2: the cavalry clash went dramatically wrong for Parliament, with Simon rolling some abysmal dice to see the first line of units swept away in rout and fleeing off the table.


Leaving the Royalist cavalry ready to repeat the performance, in the next turn, against the second line of Parliament horse that were now in poor shape (red markers indicate hits, and green disorder). 


Elsewhere, Parliament's infantry edged towards the stationary Royalist foot and the fight between the smaller cavalry wings also played out in favour of the King.


And beyond all this amongst the hedged enclosures, the two opposing dragoon units advanced towards each other.


Turn 3: the fickle dice turned on the Royalists (or depending on your perspective made amends to Parliament) and much of the triumphant Royalist horse was sent packing.


The infantry on both sides advanced cautiously exchanging shots at long range as did the artillery which had been steadily firing away to take the edge of a unit or two.


While the dragoons just eyeing each other with intent, the smaller cavalry wings continued to battle it out.  Some of the Royalist horse finding itself now caught between the two lines of advancing infantry decided to charge the Parliament foot rather than be shot down in place.


This bold (foolhardy?) move almost paid off, as with their seven combat dice I rolled five 6's, a 5 and a 3 (needing 5+ to hit)!  But the Simon rolled very well on his saving throws and the foot were only forced to disengage.

Turn 4: the Royalist cavalry's luck didn't carry through to this turn and a crashing volley from the Parliamentarian foot convinced them to flee the field not to return.


Meanwhile the larger Royalist cavalry wing had managed to sort itself out and drive off the last the opposing horse; in response to which Essex's Foot regiment was deployed to protect the now open flank.


The Royalist cavalry had more success when Gentlemen Pensioners managed to catch the London Trained Bands Blue Regiment by surprise but failed to break it, only forcing a retreat.  Elsewhere the infantry continued exchange volleys to little effect as did the dragoons.


Turn 5: saw the last of both sides weaker cavalry depart the field while in the distance the Royalist dragoons charged their opponents only to be rebuffed.


The Gentlemen Pensioners now paid the price for their foray into the centre of the Parliament army as fired on from several sides the survivors fled the field.


But at the end of the turn, Essex, with his beleaguered infantry bereft of any cavalry support, concluded the day was lost and withdrew his army to fight another day.  

In Tercios, games only last 8 turns at most and victory is only assessed after the 5th and subsequent turns.  The advantage (in lost units and commanders) required to win reduces each turn after the 5th, and in this game the Royalists just managed to get far enough ahead to call a decisive victory in the 5th turn (a decisive victory is the only victory allowed in turn 5).

Simon seemed to enjoy the game despite not knowing what he was doing in the first turn or two.  And, as he was talking about buying the rules, I guess the game met its objectives.

If you are interested in these rules the 'lite' version, that pretty much covers everything except some terrain and commanders, is available as a free pdf at:


Good Luck!

A Cornucopia of Away Games and Mistakes

The cabin and painting desk have been deserted lately as I went to my friend Martin's place for a couple of day's gaming.  Well, perhaps 'mainly gaming' is a better description, as on the Tuesday evening we just went down the pub for a few pints of Harvey's Sussex Best.  Much like most of the later games I was too absorbed to take photos so this stock photo from the Interweb will have to suffice.


The following morning, when we got our act together, we had a game of 'Mortem et Gloriam', aka MeG, not something I had played before but I was keen to try it and Martin had played it several times as it's a popular rule-set at his local club and he wanted to get some more practise.


The game pitched my Normans as Sicilian Normans, with additional 'Sicilian' types being provided by Martin ... 


... against his Nikephorian Byzantines.


With a newbie (me), guided by an inexperienced player, unfamiliarity with rules saw this game run through to the early afternoon when, as the inevitability of a Norman win became apparent, we called the game.  The rules worked well in terms of outcomes and command structure, with commanders forced to prioritise their actions, but I didn't feel they offered anything new compared to existing rule-sets.  In particular I felt the focus on the files within units felt like a half-way house that was neither unit nor element focused and the separate charge and mêlée phases seemed to slow the game down.  However, these are just first impressions and I need to try them again sometime as I've often disliked rule-sets on first encountering them only to appreciate their virtues with more games.

The next game was a Thirty Years War clash using the 'Liber Militum Tercios' Rules, our favourite for this particular conflict.


These rules use order cards that are placed face down next to each unit with players alternately activating units to perform the order given them.


Looking to play something a little different we opted for an entirely mounted French force seeking to destroy a Spanish infantry force (plus one unit of horse); all troops being provided by Martin.

This proved a really interesting tactical conundrum with the more agile French horse looking for an opening that wouldn't involve frontally charging pike and the Spanish trying to deny them that opportunity.  In the end the French managed to charge a couple of the Spanish tercios in the flank (sorry, this is the only photo I have) ...


... but in both cases the Spanish, while taking many hits just survived being broken and with some French units refusing to charge managed to rally.  The French losses from these combats and Spanish musketry and cannon fire eventually saw several units break and the French conceded the field.  While a fun game with rules we've often played, we still made a number of mistakes that probably drove the outcome.  We also discovered we had always interpreted one rule incorrectly, luckily that error had no real impact on the game.  

So, onto a third game in the evening using Maurice; no picture of the rules so another image grabbed from the ubiquitous web-thingy.


This game used my 1745 armies (15mm Essex Miniatures) and some modifications to the rules to try and bring out a bit more conflict specific flavour.


No rule cock-ups this time, but I still haven't quite got the balance right between the two armies, and the Highlanders rolled over the Hanoverians without loss!


The following morning, we set up a DBM fight between the Rus (me) and the Bulgars (Martin), albeit the armies had to take some liberties with the Army Lists as we didn't have everything needed.

This game, like the earlier Tercios game, saw the Rus desperately trying to stop the Bulgar cavalry getting round their flanks, as they were fairly impervious to cavalry charging them frontally.  The Rus axemen ('Blades' in DBM-speak) were the least effective against cavalry so were held back as a reserve to plug any gaps that appeared as in the photo below - and contributed to the Rus' success in defeating the Bulgars.


The figures in this game were all Martin's beautifully painted 15mm Minifigs, so nice in fact that for once I took some decent photos, this time of his Byzantine Varangians being used to represent Rus Axemen.


Again we made a mistake!  This time over the PIP cost of moving irregulars but luckily corrected in Turn 2, so it had minimal impact on the game.  When this game ended it was lunchtime, after which I wended my way back home.  

So, four games in a day and half, lots of fun but lots of mistakes.  I'm not sure what the lesson here is, but I suspect I need to play more games with fewer rule-sets as it seems that, like so much in life, practise makes perfect, or at least less imperfect.