From the German 'Kabinettskriege' - Cabinet Wars: a period of limited conflict from the Peace of Westphalia (1648) to the French Revolution (1789).

Caesar's Camp - Scenario 1 - CoC AAR

Capturing Caesar's Camp, 3rd June 1940 - a pint-sized campaign 

Finally, after all our practise games and familiarisation with the new, 2nd Edition, Chain of Command rules, John and I finally kicked off our campaign for real.  As we were both politely offering each other the chance to choose sides, John's wife broke the deadlock by rolling a d6, and duly appointed John as the British commander (or should that be allies?) and me as the Boche.

Scenario 1 - 'Attack on Hedgehog Wood'

The first scenario, see map below, is a delaying action by the Germans.  


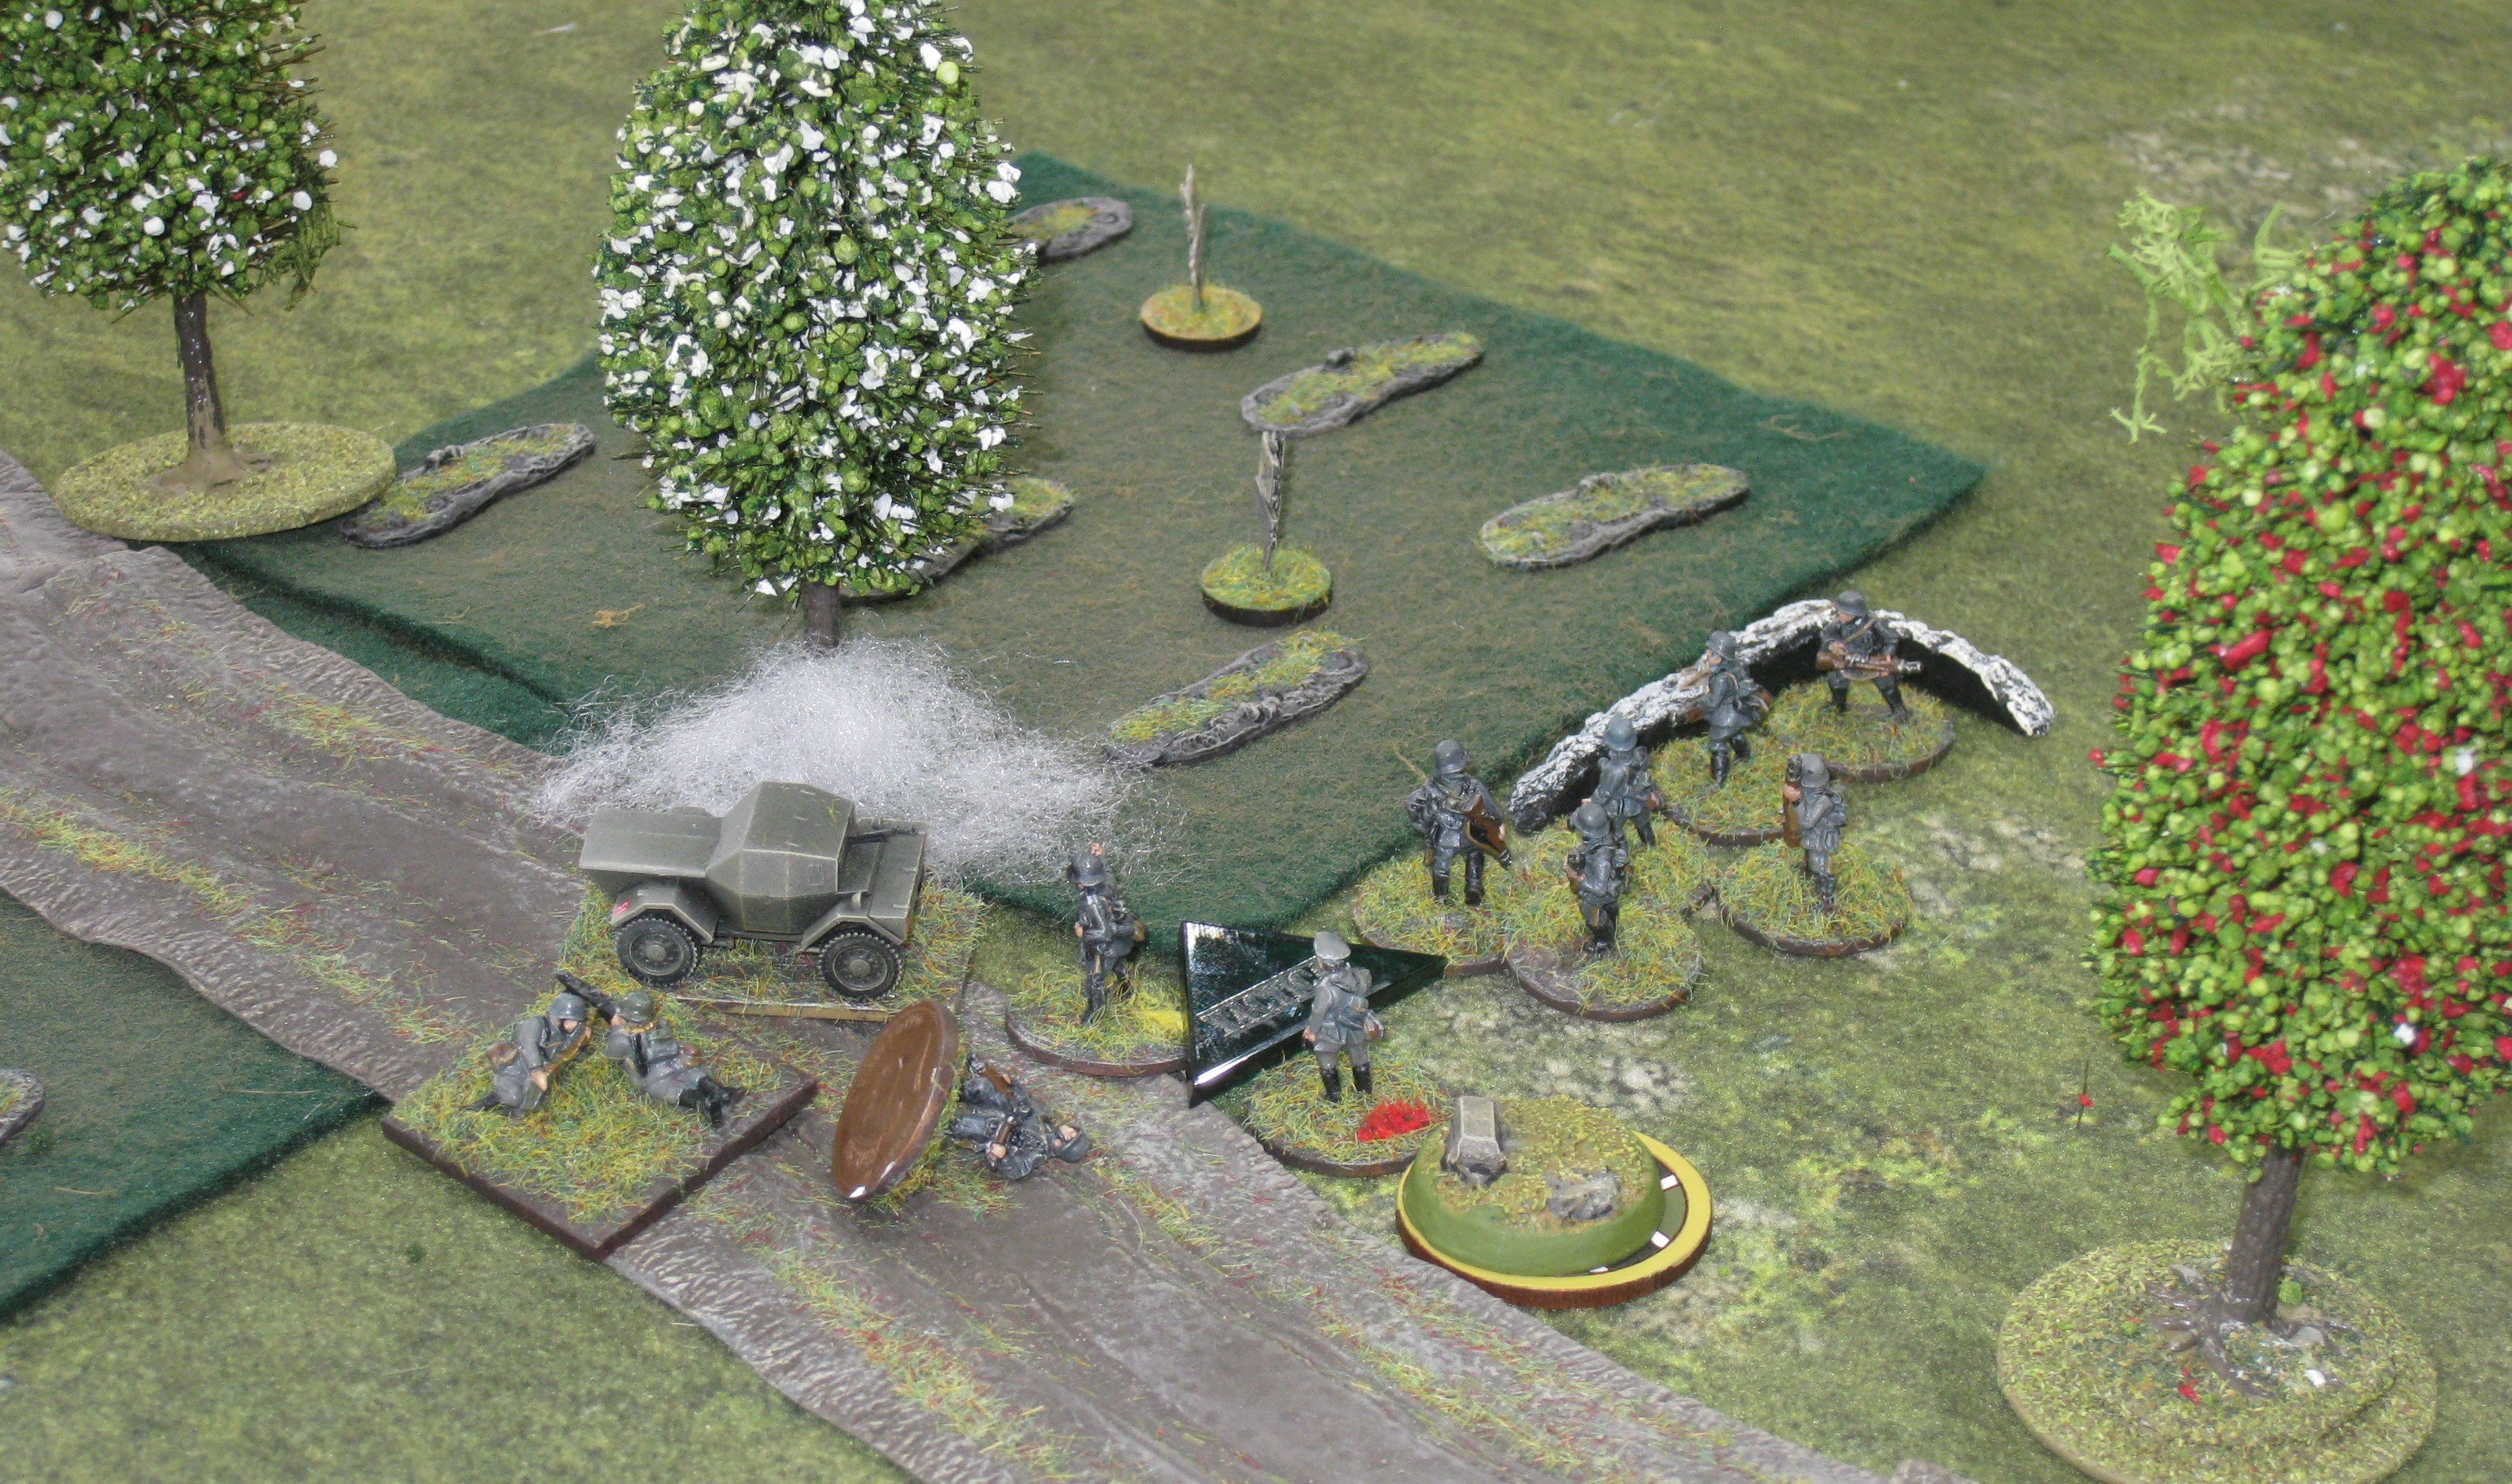
As I couldn't get far enough away from the table in my bijou cabinette to take a photo of the whole table from the British side, as in the map above, I had to settle for one taken from the right hand, or eastern, edge.  The knocked-out Dingo scout car can be seen in the bottom right of the photo - this was the scenario objective.

I don't know where the trees for the small copse (green felt template at bottom left of the photo) went when I took the photo but they were there when we started playing.  Anyway, the dice rolls for Force Morale saw the Germans supremely confident on 11, while the British were a little less sure of themselves on only 9.

Both sides needed to get possession of the Dingo ...


... 
to recover important papers left inside.  Possession of these papers gains either side a full CoC die at the start of Scenario 3, but the British are really up against it to get there before the Germans.

The Patrol Phase

As a result of the placement of the objective (Dingo), both sides concentrated their Patrol Phase activity along the road to get as close as possible to the scout car.  The Brits get 1-3 three moves before the patrol phase proper starts.  However, John threw a '1' and only got one move before the Germans, courtesy of their higher Force Morale started the patrol phase proper.  As a result, the British Jump Off Points (JOPs) were all clustered around where the road entered their table edge (note the copse now complete with trees!).


The German JOPs were strung out in a line, with two taking advantage of the hedges and one placed within deployment distance of the Dingo, courtesy of the scenario specific rule allowing the Germans to place one JOP anywhere in their deployment zone regardless of patrol marker locations.


Now, the question of what support to procure with my 8 points (the Brits get 12).  It seemed fairly obvious that the Brits would go for a Pre-Game Barrage as it represented their best chance to rush the objective before I could seize it; any such rush if successful would most likely also shut down my JOP placed near the objective so, what would I need to stop this?  MINES!


To be precise, I deployed two minefields (1pt each) around the wrecked Dingo which cut off any direct approach by the British, and also reduced the risk to my JOP (NB: the minefields do cover the road as well, it's just that I thought the templates looked better under the road).


With my remaining points I selected: an le.IG 18 7.5cm infantry gun with junior leader (Jnr Ldr) and five crew (4pts); and, two entrenchments for a single team (1pt each), for a grand total of 8 support points.  

In addition to their pre-game barrage (2pts), John, although unknown to me at the time, with his 12 points opted for: a Dingo scout car with junior leader (2pts); two carriers with a junior leader and 2-man Bren team (3pts each); and, 1x 2" mortar (2pts).

The Game

John as the attacker took the first phase and promptly rolled two '6's for a double phase!  That could've been really bad news if I hadn't opted for the minefields, but then I was surprised when instead of the expected Dingo scout car a pair of Bren Gun carriers appeared.  The next British command dice roll didn't allow John to do much (courtesy of a '6' and three '5's), other than deploying one of his platoon's senior leaders (Snr Ldr) into the copse.


Now it was my first phase, and unsurprisingly I chose to deploy a section with an entrenchment at the Dingo objective (the Rifle team in an entrenchment and the LMG team using the Dingo for cover).  What was more surprising was that, despite the pre-game barrage, the section deployed, tactically, without any trouble, as did one of my senior leaders, although the supporting 7.5cm infantry gun team didn't show up.


Another poor command roll saw John limited to cautiously advancing one his carriers to engage my section with their Bren.


Despite the hard cover provided by the Dingo wreck, they did manage to kill one of my LMG gunners but inflicted no shock.


Lacking a '1' in their command dice, to deploy their 7.5cm gun[1], the Germans thought it best to just sit tight, and tactical, in their hard cover.  Besides, spending a full, unpinned, phase in possession of the Dingo wreck would gain them the papers and the full CoC die for Scenario 3.  

With some better command dice, John, anxious to restore some momentum to his attack, deployed one of his infantry sections and a Dingo scout car that also opened fire with its Bren.  


In return I now fielded another section (with one entrenchment for the LMG team and the Rifle team taking cover behind a hedge to my right - no photo) who opened fire managing to kill one infantryman.  My 7.5cm gun also attempted to deploy but failed, again.  

In reply the Brits brought on a mortar team to lay some smoke blocking the line of sight (LOS) of my newly deployed section, while their armour continued to engage my first section by the Dingo, but only inflicted some shock (my senior leader was removing the shock as fast as the Brits could apply it).  The situation at this point is shown in the overview below (the yellow arrow indicates the edge of an entrenchment and a base of the second German section who are just off-camera).


The Brits now started a steady advance, supported by the deployment of another 2" mortar team, towards the German section by the Dingo wreck, firing as they went but frustratingly again failing to inflict any casualties.


The latest British advance had brought their Dingo within close range of the first German section so, after any shock had been rallied off, my LMG attempted to drive it off - it failed.  I also, FINALLY, managed to deploy the 7.5cm gun which attempted to target the infantry advancing in the open behind the armour killing one man but inflicting no shock.

John continued his advance firing as he went but again could only manage to inflict shock (we had some very odd rolls for casualties during this game).  At this point I realised[2] there was little to gain by fighting on because:

1. This scenario in the campaign is only fought once regardless of the outcome, and does not directly affect the overall campaign outcome.

2. I had already gained the objective (and free CoC die for Scenario 3) and if I went on to win the game all I would get would be the option to buy an off-table MMG in support of Scenario 3.  

3. I have the option of fielding this platoon in Scenario 5 in place of that which has to fight through Scenario 3-4.

So, as I'd only lost one 'dead' at this point, I ordered a withdrawal in my next phase.  The final position of this tightly constrained, but interesting, game is shown below (this time you can see where the second German section and 7.5 cm gun were deployed).


The Butcher's Bill

This was quite light with only 2 British casualties (irrelevant because this platoon does not feature again in the campaign) and one German casualty, who can be recovered in time for Scenario 5, which effectively gives me a fresh, replacement, platoon in my pocket for that game. 


Next Scenario...

This game having played through fairly quickly, we chat quite a lot of the time, allowed us to go on and play the next campaign scenario, 'The Seaforths at Trois Foetus'.  

The AAR for is being drafted and will be my next post ...


Notes:

[1.]  I had forgotten the gun came with a junior leader so I could deploy it on a '3' as well.

[2.]  To be fair, John actually asked me whether it worth me fighting on, after giving it some thought I could see his point and promptly acted on it. 

The Old, the Quick and the Obsolescent

With another so-called heatwave making painting difficult / unpleasant, I am using the time to make up some metal kits.

First out of the blocks was a British M1800 Bromefield 10" Iron Howitzer ('The Old').  This will be a drop-in[1] option for my 20mm Napoleonic gun crews.  This piece, was only used in sieges during the Napoleonic period and rarely at that, BUT it's just so full of character I couldn't resist getting one.


The armoured vehicles are to fill out my 20mm WW2 collection, and add some recce capability ('The Quick'), and some second-rate equipment ('The Obsolescent') that was fielded in NW Europe when there was nothing better available - it's also cheap (support points) in Chain of Command.


The kits are by the now sadly defunct MMS Models, and clockwise from bottom left are: a Panzer II 'Luchs' (light recce tank); a Panzer III Ausf J (still awaiting its main armament, a 5cm KwK 38 L/42); a Unic P107 half-track (a French hand-me-down used by 21st Pz); a Daimler Scout Car[2]; and a Tetrarch CS to support my upcoming Airborne platoon.

Of these, I have to say my favourite is the Panzer III, and I'm justifying getting one on the basis of several being in Panzer Kompanie Mielke at Arnhem; and I'm particularly partial to the marks with the short 50mm gun.  But, having put the kit together I have to say I found the Luchs has rather caught my fancy. 

All these kits will need some additional cleaning and filling, but I'll do them all together in a single session when they're all ready.  With the exception of the Tetrarch, I will be fitting figures to the vehicles (removable in some cases) which is why most still have their hatches missing - they will be fitted when I work out how the figures will be placed / posed.


Notes:

[1.]  I mount my gun crews on a large base and their guns on a separate base that can be dropped in amongst the gun crew.  This has two benefits: one the gun being on its own base is closer to the correct height compared to the gun crew; and, two I can easily swap between 6pdrs, 9pdrs and howitzers.

[2.]  Note the roof folded back, Chain of Command only lists the Daimler Scout Car as roofless but all marks after the first had a roof that could be folded back.

Sleepwalking through MeG & ADLG

This is just a very quick post, more of a 'diary entry', on a weekend spent trying out new rules, namely Mortem et Gloriam (MeG[1]) and Art de la Guerre (ADLG).  I also intended to try out another homebrew set but more on that later.

After a largely sleepless night on Thursday, it was down to Martin's in Brighton for a Friday evening in the pub together with Steve who'd also driven over for a gaming weekend.  A different pub this time, but still Harveys Sussex Best and beautifully kept into the bargain - went down a treat.


Probably not the best start, as I never sleep well after a beer session or in a strange bed.  The result, another largely sleepless night.

So, the Saturday dawned and Martin's friend John arrived with his delightful Italian Wars collection and his experience playing MeG to help us through a bath-tubbed refight of the Battle of Pavia, 1525.

Mortem et Gloriam

I took the Imperialist left wing with some Jinetes and Landsknechts (two pike blocks with attached light guns and two units of skirmishers).


Facing off against me was Martin with some Swiss (eek!), Genitors and cannon.


While outnumbered, Martin had the possibility of another Swiss pike block arriving later in the game - spoiler alert, they didn't.

My men took one look at the opposition ...


... and promptly stepped out towards them to try and finish them off before any more arrived.  Meanwhile, our respective cavalry units crashed commenced what was to be a long-drawn out mêlée.  Martin's cavalry, with their spears had an edge to start with but things evened up after the initial impact - luckily, they were not as fearsome as the Ottoman Dellis who were standing in for them.


A few turns later the first of my Landsknecht blocks finally got stuck in, the other was lagging behind, delayed by the Swiss cannon fire.


The cavalry mêlée rumbled on, but only Genitors were taking losses ...


... as my second Landsknecht unit came up and ...


... joined in the Swiss-bashing session.


And then suddenly it was all over; first my Jinetes, still at full strength, routed what was left of their opponents ...


... then, as they came up alongside my Landsknechts the Swiss were gone[2] ...


...and all that was left was for Martin to ride over and surrender.


While all this had been going there had been plenty of frenetic cavalry action taking place to my right.


But I had taken little of this in so, just a couple of photos will have to suffice.  Firstly, the swirling cavalry fight which went to the French ...


... and finally, the arrival of the Spanish infantry whose firepower finally decided the battle.


Art de la Guerre

I was already starting to fade as John packed his Italian Wars armies and departed.  Then Martin readied his 15mm armies on table for a game based on the Battle of Kleidion, 1014, between the Byzantine Basil II the 'Bulgar Slayer' and the Bulgarian Tsar Samuel.  We went for a fairly basic set up as time was short and as ADLG 'newbies'[3] we wanted to keep it simple.


This was played as a 'chit game'[4] so we had each picked a personal identity from among the commanders in the field and during the game took it in turns to pull out a name of a commander to play during each game turn.

I only took a few photos during this game as:
1. I wasn't enjoying it, this is not an indictment of ADLG, as I often dislike rule sets on my encounter with them; and,
2. I just couldn't stay awake and had to sack it early.

So, just a couple of choice pictures of Martin's nicely painted troops.


The Cancelled Game

The following day I was to run a game with my home-brewed rules for 6mm Napoleonics, albeit heavily based on a set of Napoleonic Rules for Large Scale Wargaming.


Unfortunately, worrying over whether the rules were really ready for a play-test kept me awake most of the night.  Now seriously sleep-deprived I had to apologise to my friends, take some Nurofen and go and lie down in a dark room.  

While I 'wimped out', Steve and Martin, like true gamers, broke out a Thirty Years War game using Liber Militum Tercios[5], with the French taking on the Spanish.  As I didn't play in this game, I won't attempt to describe how it played out and will just post a few photos I took later in the day when I was feeling a bit better.

The French infantry dares to take on the Spanish Tercios, and wins!


The Musketeers run away!


And finally, Martin's desperate attempt to get two '6's on just three dice to stop the Cardinal's Guard from breaking and fleeing the field.  He threw '6's on all three dice!  A 1-in-216 chance!!!


Post Mortem?

So, what did I learn from the weekend?  First and foremost, a need to manage my sleep better.  But with regard to the rules, both MeG and ADLG are similar to the DBx series of games but have tried to steer them in different ways: MeG with multiple elements/bases formed as units and a more sophisticated approach to unit activation, actions and costs; and, ADLG with the slow attrition of unit strength ('cohesion') in place of just recoiling or killing units.  From my limited sampling of these, I don't feel either adds much to a game, yet both, for me, seemed to increase complexity.  

In particular I felt that the way MeG breaks down the fighting to individual bases negated any benefit from multi-element units.  Also, the rigidity of the battlelines in ADLG, due to units not moving while in combat as they grind each other down, felt (for me) too mechanical.  That said I enjoyed the MeG game and will have to try ADLG again as my first impressions are often short-lived.


Notes:

[1.]  To be honest I had tried a small game of MeG before, as you might've spotted in a previous post (link), really hadn't got much of a feel for it,but I was a complete virgin when it came to ADLG - is there such a thing as an incomplete virgin?

[2.]  Actually, there are still a couple of Swiss in the top right of the frame.  These are marking where their reinforcements were due to arrive, only fate determined otherwise.

[3.]  Martin had played a small club game of ADLG once before and had a copy of the rules, Steve and I had never even read them, let alone played them.

[4.]  A previous post (link) describes the 'chit game' concept developed as a way to cope with uneven numbers of players and/or players arriving late or leaving early. 

[5.]  We're all familiar with these rules having played them often e.g. (link).