John came over today for an ECW game using my 25mm Hinchliffe collection and my rules which are a mash-up of: Command and Colours (C&C) for the combat dice which also covers morale; Victory Without Quarter (VWQ) for the card-based activation; and, Brevis Tercios for the movement. And, as it makes a nice headline photo, here's a rather nice photo of my siege gun that John sent me after the game.
 |
| Gog or Magog? |
Looking for something a little different I opted for the Battle of Adwalton Moor, 1643. This pitched a smaller, but better armed (mostly musket) force under Lord Fairfax in a good defensive position against a larger Royalist force under the Earl of Newcastle. Newcastle had fewer foot (but more pike) but twice as many cavalry. Accepting the Wikipedia estimates (there are others available), the two sides consisted of:
I had enough figures to fight this at a scale of one figure to 25 men. For terrain I based my table on the map below taken from the British Battles website (www.britishbattles.com) clipped and with a 10x5 grid superimposed to show how I mapped the battlefield onto my 10'x5' table.
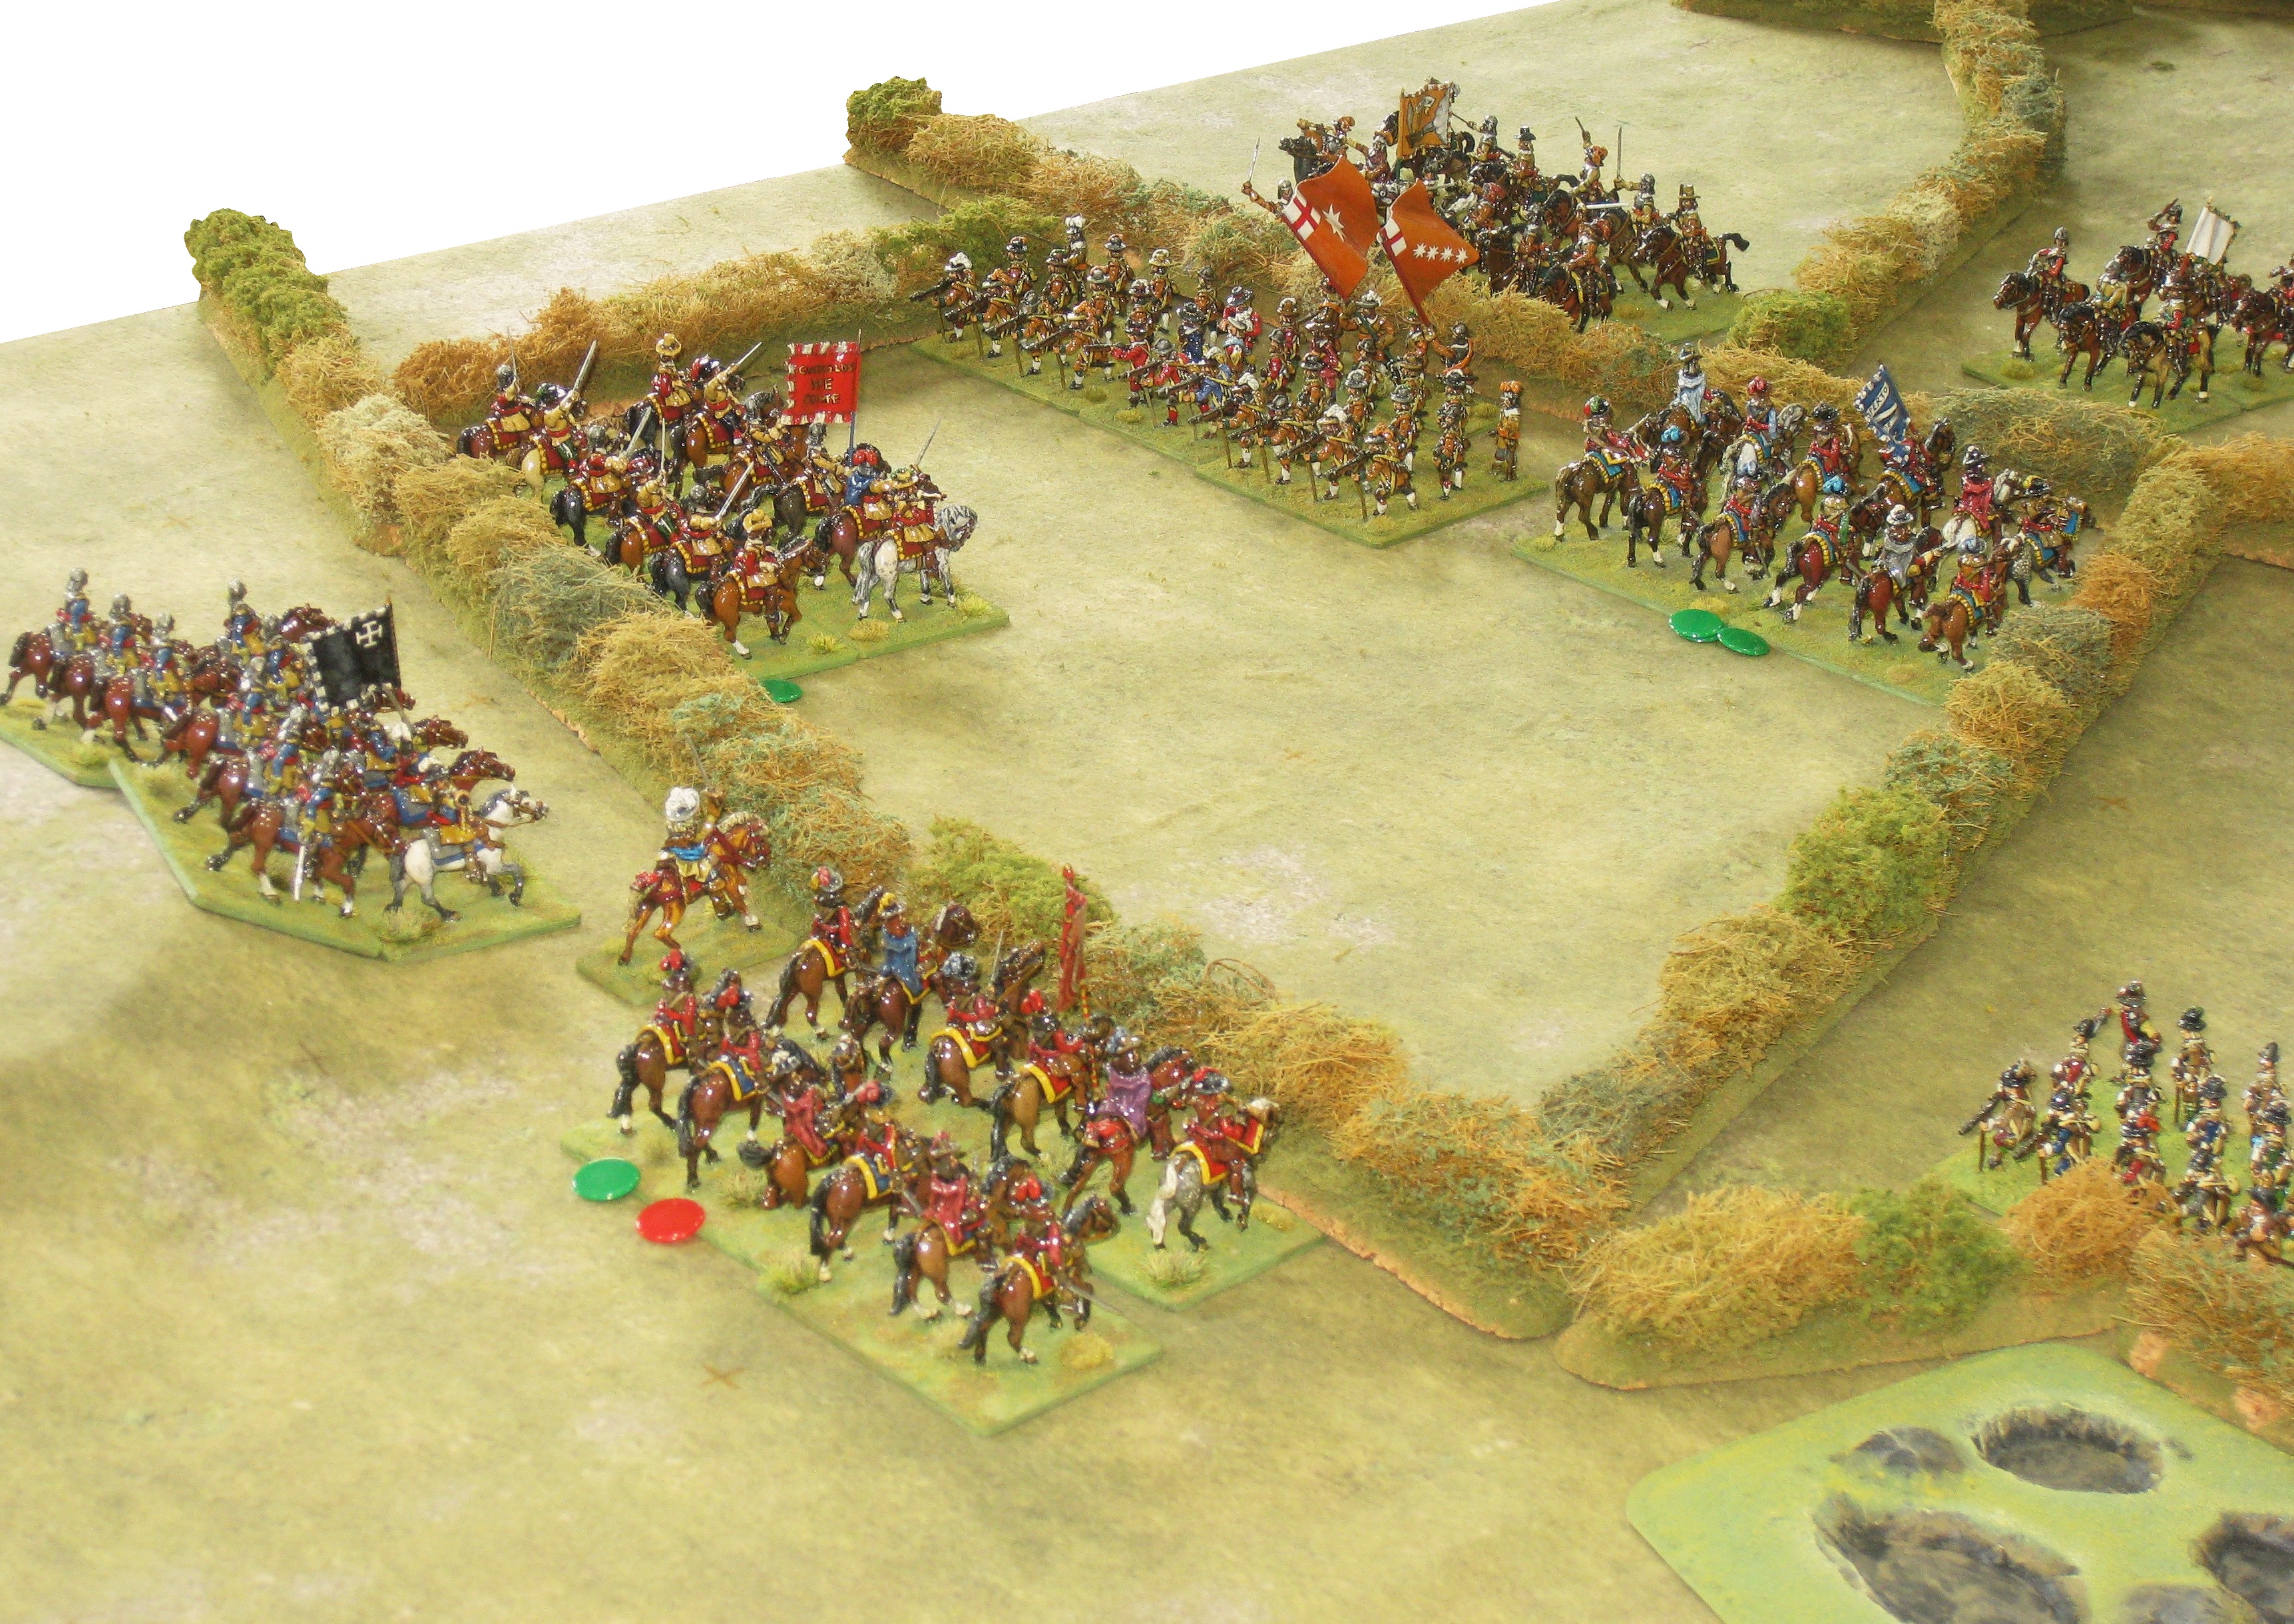
The following photos show the terrain set-up with the armies in their starting positions. First, Newcastle's view of the Parliamentarian defensive position behind the hedges of the enclosed fields and the disused open coal mining pits...
...and then, Fairfax's view of the oncoming Royalist juggernaut.
The low sun coming through the windows didn't make for very good photos so, here's a few closer ones of the troops all ready for the off.
One troop type I was short of was Clubmen, a single element having to represent the fairly large crowd that accompanied Fairfax.
However, as these had little impact on the real battle, and in my rules are pretty ineffective, we decided that it wasn't going to significantly affect the game.The first few turns went pretty quick; the Parliamentarians simply moving up to line the hedges...
...while their dragoons quickly abandoned their exposed position to nip behind another convenient hedgerow - soon to become notorious as the 'bloody hedge'.Their opposing numbers, who had intended to take this key piece of cover, rapidly advanced to contest possession. In the ensuing scuffle, the Royalist dragoons came a poor second and fled. But, before the victorious Parliament dragoons could recover, a regiment of horse came crashing over the hedge, broke them and cut them down in pursuit.However, what is sauce for the goose is sauce for the gander, and the pursuing Royalist horse were hit by a fresh regiment of enemy horse who promptly drove them back the way they had come. The following photo shows the position at the end of the turn, with the fleeing Royalist horse about to recross the contested hedge and the Royalist dragoons (white guidon) who started it all still in retreat - but they'll be back. Also, visible in the above, is the main body of the Parliamentarian foot unleashing a few volleys against the Royalist horse approaching the hedges. The dice determined this shooting to be ineffective, but it was still a bit scary up close.
In the next turn the card-driven randomised move sequence handed the victorious Parliamentarian cavalry a chance to charge before their fleeing opponents could act, and so caught them in the rear and up against the 'bloody hedge' and wiped them out.
Further along the line the Royalist horse attempted to force their way into the hedged enclosures. With the first few attempts being rebuffed.
But in the next turn, with the defending musketeers caught unloaded after repelling one attack, and courtesy of the fickle card-driven activation sequence, a subsequent charge managed to break in. Not only did they manage to fight their way in but some spectacular combat dice saw them destroy the musketeers, but left them badly disordered (as shown by the small pile of green markers behind them).
While all this has been taking place all attempts by the Royalist artillery, including the mighty demi-cannon (32-pounders!) Gog and Magog, to soften up the Parliamentarians had been frustrated with their fire being repeatedly blocked by their own troops (as turned out to be the case throughout the game).In the next turn, the fighting around the 'bloody hedge' continued with Crisp's Royalist troop ignoring the odds and plunging into the Fiennes' regiment of horse. Things looked promising until their opponents threw four 'Flags' in the combat!
 |
| One in a Thousand! (actually 1:1,296) |
This saw them retreat all the way back to Adwalton; the next photo showing them disappearing into the distance along the old Roman road. It was only because we were playing lengthways on the table that their 61" retreat didn't see them gone for good. But, once again, the more numerous Royalist horse had another unit ready to step in, and Loughborough's horse promptly threw back Fiennes' who sought shelter behind a friendly unit of foot.But this time the Royalist pursuit was unable to remain in contact and, surprisingly for once, didn't pursue any further. Whether it was this that spooked the horse of Parliament's Sergeant Major General of Foot's horse is not known. But (in a random event) he was thrown and consequently unable to exert any influence on the battle for a turn.
Apart from the return of the rallied Royalist dragoons to the 'bloody hedge'...
...a lull settled over the rest of the battle where the exhausted troops stared each out as they sought to recover their breath (and order) ready for another effort. The exception being another commanded shot unit, no longer benefiting from standing behind a hedge, being destroyed by the Royalist horse that had previously broken in (the enclosure now belonging solely to the Royalist horse).
Some early end-of-turn cards from the sequence deck saw little happen in the following turn. But, the very next turn saw the 'bloody hedge' live up to its soubriquet with the Parliament horse charging and destroying the dragoons lining it. It was all over so quick there was no time for a photo... :o(
The value of reserves was again proven as Parliament's victorious cavalry were caught while pursuing and thrown back over the 'bloody hedge' by Caernarvon's horse, while yet more cavalry on both sides advanced alongside them.
Over in the enclosures, the Royalist horse started to press on into the next fields.
The following turn was dominated by Meldrum, who, in a random event, decided to launch all his available troops in an all-out counter-attack against the Royalists.
This saw his foot foolishly attempt to charge the Royalist horse, who promptly counter-charged and caught them while moving, throwing the foot into disorder. Despite this and taking some heavy losses in the fight they threw back Loughborough's horse who can be seen in full retreat at the bottom of the next photo.
The cards then ended the turn before much else could happen, other than another random event saw Meldrum (again!) inspiring his troops to recover their order following his wild counter-attack.In the next turn, the Earl of Caernarvon, now reduced to a single effective unit, his own regiment of horse, decided it was time to intervene in person. So, eschewing any attempt to rally his blown regiments he attached himself to his regiment and charged. This proved an inspired decision[1], as he destroyed the enemy horse to his front and the resulting pursuit saw him almost capture Fairfax, who fled the field to save his skin. His pursuit also took him on to one of the Parliamentarian cannon whose crew decided, that rather than die for Parliament, they would fight for the King, and promptly changed sides.
What was happening elsewhere you ask? Well, Newcastle had finally prompted Crisp's troop to start the long trek back from Adwalton to rejoin the fight.And the fight for the enclosures had bogged down into an inconclusive slugging match, but the Royalist infantry had at last come up in support of their cavalry to break the deadlock.
The next turn was again a short one with little taking place beyond the massed Royalist pikes finally getting close enough to pressure Parliament's left flank.
And so, to the end-game as the sun sank slowly in the West (our time limit being reached with John having to leave). The battle petered out with the turncoat artillery failing to inflict any harm on their erstwhile comrades - some say they weren't really trying.
And on this sorry note, with no decisive combat elsewhere, the battle drew to a close.
But who had won? The Royalist horse had successfully broken into the enclosures and were now being backed up by their foot......while at the other end of the field Caernarvon's horse were loose in Parliament's rear and the Royalist massed pike were about to make their presence felt.This and a score of 9-5 (losses inflicted) in the Royalists favour, while not a clear victory, looks a lot like a winning draw to me, but then I would say that wouldn't I as I was the Royalist commander. No doubt John will point to that fact that he did better than his historical counterparts and claim that as a win.
Perhaps we'll have to fight it out again?
Notes:
[1]. The inspiration was actually John's, as he suggested that was what Caernarvon ought to do - I decided to follow his advice, no doubt John wishes I hadn't!