[Pre-Cabinette Archives c.2017.]
Fighting
the naval battles of World War 2 has a certain nostalgia as one of my first
wargames, using rules rather than marbles, was the Battle of the Java Sea. I fought this out many times on my bedroom
floor about half a century ago using ship-shaped pieces of balsa wood painted
grey for the fleets and rules by Arthur Taylor.
The rules used some simple calculations to
determine the number of hits and playing cards to determine the effect. As far as I can recall at this distance in
time, the games were dominated by the Japanese Long Lance torpedo for which I tweaked
the rules as all torpedoes were treated equally. Clearly, I’ve always felt the need to tinker with
other people’s rules to match my perception of how a battle should play out.
The inspiration for the choice of battle, and the efficacy of Japanese torpedoes, was my cherished copy of the Pan paperback on the battle.

However, since those days I’ve tended to wargame earlier periods with shorter range weapons to avoid using either, vanishingly small ship models or, massively out of scale gunnery ranges. Nowadays, I have lots more books to inspire my rule-tinkering, and among them was one that rekindled those distant memories of naval actions fought out on my hands and knees. The book in question is the John Curry re-print of the Fletcher-Pratt naval wargame rules. A fun read was all I thought it would ever be as I lacked the requisite ‘ballroom’ to recreate the original style of play.
About nine years ago this all changed when, seeking to play more games, I joined a local modelling club that also included a couple of keen wargamers. One club night, when getting a cuppa from the kitchen behind the local Baptist church where we met, I realised that at the end of the corridor was a church hall! A quick enquiry confirmed we were allowed to use it. So, seizing the moment I bought several 1:1200 warship kits from eBay and set about painting up sufficient for the Battle of Denmark Strait. The choice of scale was influenced by the size of the hall and cost; the choice of engagement by kit availability in 1:1200 and the number of ships required, i.e. only four: Bismarck, Prinz Eugen, Hood and Prince of Wales (you'll see Norfolk and Suffolk have also sneaked in as I enjoyed making the kits so much I couldn't resistthem).


With only a few hours available during an evening club session I decided I would streamline the rules and act umpire; umpires are an integral part of the original Fletcher-Pratt games. I chose to ignore secondary armament as largely irrelevant during this action and only allowed the Prinz Eugen to use torpedoes as capital ship torpedo action was such a rarity, although ironically Bismarck is the only battleship hit by a torpedo from another battleship (HMS Rodney). To speed the game, I prepared quick-play and record sheets, including a look-up chart of damage inflicted by up to four hits, penetrating and non-penetrating, to save on the mental maths required.
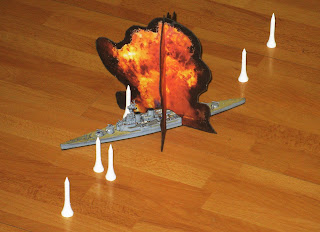
To suit the floor-space available, a scale of 1 inch equals 120 yard was selected and all movement, ranges, etc. on the QPS were converted into inches. This scale means that shooting ranges are only 3.6 times shorter than the true scale distance for 1:1200 ships. Now for the inevitable rule tinkering; a special rule was added to allow the Hood to be blown up as the rules do not allow for critical hits. The rule was that if Bismarck scored a hit directly over the main magazines at range where the fire is plunging (greater than 13ft 6”, ~19,400yds) then the magazines would explode. The main magazines, for game purposes, were ruled to extend as far as the main turrets but exclude the turrets themselves, i.e. the area outlined in red in the accompanying photo.

The photo shows the Hood’s rear turrets but a similar area applied around the forward turrets. The area is only 2.5cm long by 1.5–2cm wide, with cut-outs for the turrets, so is not easy to hit by guessing ranges from more than 13 feet away (Fletcher-Pratt gunnery rules require players to estimate the range to the target with the umpire measuring and marking fall of shot using golf tees).
Another rule was introduced to represent the problems the Prince of Wales experienced with her main armament that resulted in her firing around half the number of rounds that she should have. To represent this a random list of which guns jammed on which turn was used by the umpire to discount hits from ‘jammed’ rounds.
The game was set up to represent the historical engagement at the point just before the ships came within effective range (max. range was limited to 26,000 yards). The rough plan below which I used for the game shows the hall floor area as a rectangle (broken line).

The players quickly got the hang of the simplified rules after a couple of turns: ½” per knot and a turn of up to 45° at the start and half-way point of the move, and firing by guessing the range. The battle played out well and realistically or at least in agreement with the history books. The British, after opening fire when out of range, steered towards the Germans to rapidly close the range so the Hood could avoid the risk from long range plunging fire against her weak deck armour. This meant that only the forward guns of the British ships could bear on the enemy while both sides tried find the correct range; I ruled that ships must fire ranging ladder salvoes (with half their guns) until they achieved a straddle at which point they could switch to firing full broadsides. Bizarrely, exactly as in 1941, the British ships initially concentrated their fire on Prinz Eugen for several turns before switching to Bismarck; why, I didn’t ask, not wanting to spoil the historical coincidence. Then disaster struck, a ranging ladder from Bismarck plunged into Hood’s rear magazine and she was engulfed in a massive explosion.
This was a shocking fluke as Bismarck hadn’t even found the range yet, and never landed another hit for the rest of the engagement. The British were stunned but undeterred Prince of Wales gallantly pressed on and manoeuvred to open her arcs to bring her rear turret to bear.
She also started to dramatically vary her speed and course to throw off the aim of the German ships. This worked well against Bismarck who consistently failed to land a hit, but Prinz Eugen coped better and at one point landed the best salvo of the game (3 hits).
The radical changes in course and speed by the Prince of Wales also threw her own gunnery off to some extent but she still registered several hits on Bismarck and was lucky in having none of the ‘hits’ discounted as coming from one of her randomly jammed guns.
Time finally brought the combat to close as the club session ended and it was decided that the engagement was broken off at this point with Prince of Wales withdrawing while the Germans pressed on into the Atlantic. All in all, a satisfactory refight, with all ships suffering the fate of their historical counterparts; the exception being the Prince of Wales who escaped lightly as Prinz Eugen’s guns could not fully make up for Bismarck’s appalling gunnery.
So, with the Bismarck on the loose in the Atlantic other games were planned for the rest of Unternehmen Rheinübung: the night attack by Commodore Vian’s destroyer flotilla; the Ark Royal Swordfish strike; and, the final showdown with the King George V and Rodney (bodged up from a KGV and Iowa kit). But those stories are for another day.


.JPG)


