From the German 'Kabinettskriege' - Cabinet Wars: a period of limited conflict from the Peace of Westphalia (1648) to the French Revolution (1789).

A Russo-Japanese Naval Campaign

A potted history by a partial, prejudiced, & ignorant wargamer.

PART TWO – A Japanese Narrow Escape and a Russian Gamble, in two more battles off Wei Hai Wei.

March 1904 opened quietly as the Japanese concentrated on minelaying and troop convoys while the Russians frantically repaired their damaged ships.  As a result, several Japanese minefields were laid and the delayed Pitzuwo convoy sailed (see previous post); all without incident.  

As March wore on the Japanese, noting the growing confidence of the Vladivostok squadron, sent their armoured cruisers to take them down a peg or two.  This did not take long as the Russians were still dispersing their ships in penny-packets.  Thus, on the 22nd the Diana (PC), sent on a lone minelaying mission, found herself trapped off Wonsan by the armoured cruisers Idzumo, Adzuma and Yakumo.  With damage mounting and little hope of escape the captain of the Diana sought to save face by attempting to close and ram the enemy.  This simply resulted in the Diana being overwhelmed by the superior Japanese firepower and going down with all hands before she could close with her enemies. 

Death Ride of the Diana (22-Mar-1904): D = Diana.

Unmanned by the fate of the Diana, the Bogatyr (PC) and Goromoboi (AC) immediately fled back to port before completing their minelaying missions.  This collapse in Russian morale was widespread, and a minelaying mission by 3 TBDs refused to sail although some claim this was due to faulty staff work and confused sailing orders [1].  In contrast the Japanese minelaying missions were uniformly successful. 


In early April, the Russian Vladivostok squadron again sortied to drive off Japanese patrols.  So, with squalls from the south-east and 7 hours to sun-set, the opposing forces encountered each other while both steering to investigate merchant shipping.  Losing their nerve on sighting the enemy the Rossiya, Goromboi (ACs) and Bogatyr (PC) turned tail and fled.  The Japanese pursued and, confident in their superiority, detached the Takachiho (PC) to investigate the suspicious merchant vessel.  The remaining Japanese ships, Iwate, Nisshin, Kasuga (ACs) and Naniwa (PC) rapidly closed and started to register repeated hits on the Russians who in reply could only manage a single hit on the Kasuga.  

The Russians, outmatched and with all three vessels crippled, fled in disorder with the Japanese in hot pursuit.  

Once again nightfall was the Russian saviour with the Rossiya and Goromboi disappearing into the gloom as the Bogatyr slid beneath the waves.

Sea of Japan Fight (7-Apr-1904): broken tracks = merchant ships, B = Bogatyr(smoke plumes indicate crippled ships).


Simultaneously with the action in the Sea of Japan, the Japanese attempted to lay more mines off Port Arthur but aborted the mission in order to show a clean pair of heels to a sortie by the Russian battle fleet.  It later transpired that the Russian fleet had only sailed to screen the laying of mines off their own home port; a craven act by a dispirited foe.  Other Japanese minelaying missions were successful off Wei Hai Wei and in several locations in the Sea of Japan.

As April dragged on the Russian armoured cruiser Rurik (AC) snuck out of Vladivostok, but on sighting smoke she fled ceding control of the harbour approaches.  While this trivial skirmish was taking place around Vladivostok the Russian battle-fleet sortied from Port Arthur to challenge the Japanese battleships cruising off Wei Hai Wei.


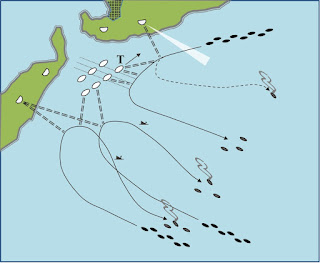
The 2nd Battle of Wei Hai Wei: on the 23rd of April the 6 Japanese battleships were patrolling off Wei Hai Wei in appalling weather conditions (heavy seas with a strong wind from the south-east).   

So, when, 8 hours before sun-set, the entire Port Arthur fleet (5 BBs, 1 AC, 2 PCs, 2 LCs and 9 TBDs) was spotted sailing over the horizon they were somewhat taken aback.  

Clearly the Russians had at last found sufficient courage (or vodka!) to seek battle outside the security blanket of their shore batteries.  Although outnumbered, Admiral Togo was not dismayed as he realised the Russian fleet was poorly arrayed and would be forced to split either side of an intervening island.  This, together with the bad weather, would allow him to concentrate on part of the enemy fleet while keeping his distance to allow him to escape into the night should things go awry. 

The battle unfolded as Togo foresaw with the Russian fleet, in a shameful display of poor seamanship, struggling to form up while the battleships traded blows. 

This allowed Togo, as anticipated, to ‘cross the T’ of the Russian battleships as they sought to get into line.  However, the Gods of War [2] do not always side with better tactician and Russian gunnery proved exceptionally lucky, crippling two of Togo’s battleships, while the Japanese suffered the agony of repeated near misses. 

Togo recognising the need to preserve his fleet ordered a general withdrawal with all ships making best speed to escape.  As the exultant Russians closed in to press home their advantage, Togo in the Mikasa, aided by the Fuji and Yashima, placed himself between the pursuing Russians and the crippled Shikishima and Asahi.  

As if recognising this brave and selfless act, Fortune now switched her favour to the Japanese and the Russian battleships had to take what, up to now, they had been content to give and the Petropavlovsk and Poltava were crippled by repeated hits.  

Rattled by this turn of events the Russians fled allowing the Japanese to continue on their way home for urgent repairs.

Second Battle of Wei Hai Wei (23-Apr-1904): Togo crosses the Russian ‘T’.

In retrospect, the Japanese were lucky to encounter the enemy fleet in heavy seas that prevented the Russian cruisers, and especially the TBDs from being able to make enough headway to get into the action.

With the Russian fleet back in port and licking its wounds after the Battle of Wei Hai Wei, the latest Japanese troop convoy sailed into Chinampo without incident, its escort wishing it had been assigned duties with a greater chance to prove their metal.  Japanese minelaying missions also benefited from the absence of the Russian fleet and, with exception of another abortive attempt against Port Arthur, laid mines off Chinampo, Vladivostok and Wei Hai Wei.  The failure at Port Arthur saw the Chiyoda (PC) fleeing from a TBD patrol; her captain’s claim that the TBDs could have presaged the arrival of the Russian fleet was widely ridiculed and with his career in tatters he terminated his service in the time-honoured fashion. 

In early May with the battleships of both sides under repair the Japanese navy saw the addition of a brand-new protected cruiser, the Tsushima.  While the Russians possessed the only undamaged battleship, the Pobyeda, their limited repair capacity meant that the Japanese fleet would be battle ready first.  Seeking to exploit their temporary advantage the Russians sortied the Pobyeda accompanied by several cruisers and TBDs to chase off any Japanese cruiser patrols and disrupt the minelaying off Wei Hai Wei.  The Russian willingness to gamble on entering a mined area was driven by their desperation to seize the initiative.  Desperate gambles are of course a poor tactic, and this one rebounded on the Russians with armoured cruiser Bayan striking a mine and sinking with all hands.  The Russians, disheartened, pressed on only to encounter the patrolling Japanese armoured cruisers; the Idzumo, Adzuma, Tokiwa and Iwate.


The 3rd Battle of Wei Hai Wei: on the 14th of Map, in calm seas with 4 hours to sun-set, both squadrons sighted each other separated by two small unnamed islands which constrained their shooting.  

The Japanese concentrated their fire on the Russian protected cruisers and TBDs which, less the ill-fated Bayan (AC), they comfortably overmatched.  The Japanese intent was to inflict sufficient damage on the enemy cruisers to shatter Russian morale before battleship Pobyeda could land a fatal blow on them.  

These tactics soon paid dividends with the cruiser Askold being crippled and falling out of the line to independently return to Port Arthur.  To draw fire away from their cruisers the Russian TBDs boldly advanced between the islands to launch a torpedo attack.  

Once again Russian tactical ineptitude was exposed and the Japanese armoured cruisers unleashed a deluge of fire on the TBDs forcing them to withdraw with four of the six vessels crippled.  

This clear display of Japanese superiority sapped the Russian will to fight and they fled, successfully evading their pursuers.  

Third Battle of Wei Hai Wei (14-May-1904): A = Askold.

Having thwarted every Russian attempt to seize the initiative and with the imminent completion of repairs to their battleships the Japanese had every reason to look forward to the future with confidence.


The Third and Final Part to Follow Soon.


Notes:
 
[1.] Actually, the result of an invalid order that required the mission to sail through an enemy controlled sea area to get to its destination (not allowed by the campaign rules).
 
[2.] The dice.

Normandy Terrain Quick Fix(?)

As the next map scenario in my 20mm WW2 Chain of Command (CoC) campaign has even more buildings than the last (see my last CoC post) I thought I should try and improve the look of my games.  Inspired by the blogger 'The Tactical Painter' I decided the best way to do that is to make bases for my buildings, which I think much improves the look of the thing...


Being an impatient cheapskate, I decide I would simply use some stiff card to make the bases with some texturing (pva glue and sand), leftover model railway grass sheets, hedges (pan scrubber or sponge cover with flock) and some walls I already had. 


My intent was that this would be a quick'n'dirty fix, but what I didn't allow for was my 2ft square modelling/painting desk.  This made it very hard to do anything else while one piece was drying.  Luckily my wife went away for a few days visiting a friend allowing me to spread the work in progress all around the house.  This helped me make much better progress, albeit there were several setbacks that required re-work, but in the end, it was done and a photo session followed.


To better illustrate how the bases better integrate the buildings onto my terrain mat there follows a series of '
with and without' photos, that I hope make it look like a worthwhile exercise.


A Russo-Japanese Naval Campaign

A potted history by a partial [1], prejudiced, & ignorant wargamer.


PART ONE – From Disaster at Port Arthur to Recovery at Chemulpo.

As 1903 gave way to 1904, the tension between Russian empire and Japan boiled over and the Japanese decided to get in the first blow.  The Czar’s new naval base at Port Arthur made this the obvious place to strike and the army was ordered to seize it forthwith.  However, the deployment and sustainment of the troops tasked with the capture of Port Arthur was the responsibility of the Imperial Japanese Navy (IJN) who needed to wrest control of the sea from the larger Russian Pacific Fleet.  

Seeking to even the odds the IJN sortied its entire torpedo-boat-destroyer (TBD) fleet (19 vessels) for a pre-emptive night-attack on the Russian battleships (BBs) anchored in the roadstead outside the entrance to Port Arthur.  The northern  attack force slipped in undetected past Russian TBD patrols and shore batteries [on a D6 roll of 1-4].  Unfortunately, the battleship Tsarevich was more alert and spotted the approaching TBDs as they entered searchlight range and opened fire.  As the shore defences slowly came to life an increasing volume of fire lashed the intrepid TBDs as they sought to close to torpedo range.  The flag division of the northern TBDs (Shirakumo & Asashiwo) almost immediately took a series of crippling hits and was forced to retire.  The remaining three divisions managed to close and all six boats delivered a text-book torpedo attack on the stationary battleships.  How the Russians emerged unscathed will probably never be known, but saboteurs in the torpedo depot seems the only credible explanation for every single torpedo failing to strike home [I can think of no other reason for such a poor series of dice throws].  

As the Tsarevich got underway and backed out of her berth the other battleships and shore batteries switched fire from the retiring northern TBDs to the squadrons still approaching from the south.  Undeterred, the TBDs pressed on through a maelstrom of fire from all sides.  But, with four vessels sunk and four more crippled it was clear that not even superhuman courage could prevail against such towering odds.   With sadness in their hearts the southern attack was discontinued and the squadrons withdrew to fight another day.  With a balance sheet showing four TBDs sunk [2] and another five crippled set against a broken night’s sleep for the Russians the campaign was off to disastrous start!

Night Attack on Port Arthur (8/9-Feb-1904):  T = Tsarevich.


The failure of the Port Arthur attack left the Russian numerical advantage in battleships (7 vs. 6) intact and forced the Japanese to reconsider their war plans.  Despite this setback, the High Command’s belief in a bold offensive remained unshaken and provide opportunities they could exploit.  Accordingly, the troop convoys sailed as planned and the battleships were sent to patrol off Chemulpo to block any Russian attempt to interdict them [3].  

The Battle of Chemulpo (10-Feb-1904): 6 hours before sun-set, with squalls from south-west, the Japanese sighted a squadron of four Russian battleships escorted by TBDs sent to assist the Variag (PC) and Korietz (OPC) escape from Chemulpo.  The Japanese immediately rang up full steam ahead and steered to attack.  While the Japanese battleships engaged their opposite numbers the armoured cruisers steered to stop the enemy ships escaping from Chemulpo.  The escape attempt was quickly foiled with the Korietz was sunk and the crippled Variag turning tail and limping back into Chemulpo where she was scuttled to avoid capture.  The battleship contest was also brief with the outnumbered Russians seeking safety in flight.  The Japanese seeking to press home their advantage were thwarted by the unstable Shimoze filling in their shells [4] with many detonating on impact before penetrating the Russian armour.  The fleeing Russians concentrated their fire on the Imperial flagship (Mikasa), which was crippled and forced to fall out of the battle-line.  The Russian admiral then sought to use his TBDs as a shield in an attempt to buy his escape with their lives.  The Japanese battleships contemptuously swept the TBDs aside, sinking and crippling many and still managed to inflict damage on all the Russian battleships before they escaped into the failing light.  The final spiteful act of the fleeing Russian battleships was to cynically target the weaker armoured cruisers (AC).  The Asama (AC), overmatched and crippled, slewed to a halt directly ahead of the Yakumo (AC) which put her helm hard over.  Too late!  The Yakumo crashed into the Asama sending her to the bottom.  The Yakumo damaged in the collision, and the Idzumo (AC), both suffered further hits from the fleeing Russians as they stole away into the murk.  As night fell the Japanese were left in command of the approaches to Chemulpo but at a high price: the battleships Mikasa crippled and the Yashima, Asahi and Shikishima damaged; and, the armoured cruisers Asama sunk, Yakumo crippled and Idzumo damaged.  To set against this loss they had damaged all four Russian battleships, eliminated the protected cruisers Varyag and Korietz, and sunk 8 TBDs and crippled two more.  But more importantly, with the sea swept clear the Chemulpo convoy arrived unscathed.

Battle of Chemulpo: M = Mikasa, A = Asama, Y = Yakumo, V = Varyag, K = Korietz.


In the post-mortem following the battle the Japanese were at a loss to understand why the Russians had only committed 4 battleships leaving them outnumbered in a key action.  They were not left wondering for long as the cruiser escort scouting ahead of the convoy to Chinampo spied the ‘missing’ Russian battleships blockading the port.  The convoy was turned about unnoticed by the patrolling Russians and slipped away back to Sasebo to sail another day.  Reviewing the first weeks of the campaign the Japanese concluded that, after a bad start, they had performed well against the larger fleet only being robbed of a decisive victory by their defective ammunition.  While faulty shells could be replaced it was unlikely the Russians would again commit the error of dividing their battleship force in the presence of the enemy.  However, with 4 Russian and 3 Japanese battleships undergoing repair a small window of opportunity opened during which the Japanese would have parity in capital ships [5].

The next phase of Japanese operations (Late-Feb 1904) started with a bold attempt to bottle up the Russians in Port Arthur.  A small force of cruisers sent to lay a minefield off the port inexplicably encountered no enemy patrols and completed their mission unhindered.  This failure of the Russian high command to grasp the importance of patrolling the approaches to their base was only matched by the dispatch of 7 TBDs to bombard Pitzuwo.  This mission, chased off without loss by a Japanese patrol, was a fool's errand as the TBDs lacked the firepower for an effective shore bombardment [6].  The same could not be said about the force sent to bombard Chemulpo. 

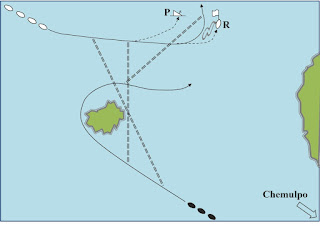
The 2nd Battle of Chemulpo (28-Feb-1904): in rough seas with only 3 hours to sun-set, a menacing line of 3 Russian battleships with an armoured cruiser and other vessels in support closed on Chemulpo with evil intent.  However, before a bombardment could be visited on the unsuspecting port, 3 Japanese battleships hove into sight over the horizon.  The opportunity for an even match was there for the taking and this time the Japanese, having replaced their faulty shells, were no longer fighting with one hand behind their back.   The Japanese, assuming their foe would head out to sea to gain sea room, were wrong-footed and temporarily lost sight of the enemy as they swung around Chemulpo Island.   As the Russians emerged from the far side Japanese fire began to tell and the Peresviet was crippled and, temporarily out of control in the heavy seas, was struck by the following ship, the Retvizan.  As the fatally holed Peresviet slipped beneath the waves the remaining Russian ships fled into the night abandoning the crippled Retvizan to its fate.  The Japanese not wishing to see the helpless crew of the Retvizan consigned to a watery grave accepted its surrender and took it as a prize back to Sasebo. 

Second Battle of Chemulpo: only Russian BBs & AC shown; P = Peresviet, R = Retvizan.


This action, during which the Japanese only suffered damage to the Fuji (BB), marked a turning point in the campaign with the Japanese overturning the Russian superiority in battleships.  It also marked a change in battle tactics with both navies increasing the separation between ships sailing in formation to avoid the catastrophic collisions that both had experienced in the last two actions [7].  

As February passed into March the Japanese admiralty had cause for satisfaction with progress so far. 

Apologies for the lack of photos, those from the earlier games in the campaign were lost when my PC died.  

More to follow... with some photos

Notes.
 
[1]. In that is written entirely from my perspective as commander of the Japanese Fleet.
 
[2]. With 2 TBDs per base the maps only show one ship symbol for every two TBDs.
 
[3]. As explained in the previous post the Japanese accrue victory points (VPs) for successfully convoying their army across to attack Port Arthur.  Convoys may delay their sailing schedule by up to 3 turns and still gain the VPs, thus the Russians are unsure of exactly when they will sail.
 
[4]. In the campaign the Japanese, as happened historically, replace their defective ammunition after the first battleship-vs-battleship action in which they landed hits on Russian battleship.
 
[5]. The Japanese have six shipyards in which ships can be repaired but the Russians with only two shipyards in Port Arthur will take much longer to repair battle damage.
 
[6]. The rules only allow shore bombardment by battleships or armoured cruisers.
 
[7]. Actually, a rule amendment to make collisions less common.


"Merde!"  It's Cambronne AGAIN!

After my last post, a friend told me I had opted for the wrong colours on Cambronne's sash as, being a maréchal de camp, he should have a gold and blue sash not gold and red.  So, as my incipient OCD would not let that go, I have repainted his sash, and this time I think I've made a better job of it.  Yay!


At the same time a slight error was pointed out in the accompanying Young Guard Voltigeurs so they were also corrected.  The change is rather small and I'll leave it to the viewer to see if they can spot it.


Suchet and Friends on the Catwalk

Finally, delayed by a nasty bug, Christmas, and the New Year, the first completed figures of the year - these were among those posted as a work in progress (WiP) back in November!

First on the catwalk is Suchet, nonchalantly showing off his shiny brand-new Marshal's baton and accompanied by an ADC...


...and again, this time hogging the camera, from the other side.


Then, somewhat miffed by having to cede first place, to a mere Marshal, it's Joseph Bonaparte, King of Spain.  


Joseph was a bit of a pain as for some reason I didn't check how well he fitted onto his horse before painting him - mistake!  Trying to carve away at him and his horse to make him fit without messing up the paint job was no fun.  In the end I settled for a less than satisfactory fit, but with little re-touching required.
.


Joseph, an S-range Minifig and probably feeling looked down on by all the Hinton Hunt figures around him, insisted on a final close-up before he would leave vacate the catwalk.  


Next up, and the paint job I'm most pleased with from this batch, is General Pierre Jacques Étienne, 1st Viscount Cambronne.   He is seen brandishing his sword which was broken but rebuilt with solder - a worrying process wielding a soldering iron in close proximity to the that impressive conk.  


I did originally paint his breeches blue, as he is sometimes depicted at Waterloo, but decided to go with white breeches as in other depictions for more contrast and found I much preferred that look.  Also, I couldn't confirm the colour of his sash, whether it was red or blue with the gold (I used a mix of gold and silver paint to get a shade to match s) so opted for red - anyone know different?

Also, appearing from the Imperial Guard is an officer from the Foot Artillery.


Finally, representing the men who actually do all the fighting, a 6-figure skirmish unit of Young Guard Voltigeurs.  These, were quite fiddly uniforms to paint and took me a long time - every time I painted something on them, I seemed to spoil something else making yet more work.


Whoops!  I spoke too soon; only one photo of the new ADC to a General of Division?  Better rectify that.


 Russo-Japanese Naval Campaign - Introduction

[Pre-Cabinette Archives c.2011-13?]

The Genesis of Russo-Japanese Naval Armageddon

A few (let’s not be too picky) years ago I became frustrated with evenly matched naval encounters where players happily sacrifice their fleet with no aim other than to rob the opponent of his.  It was clear the only way to overcome this mutually assured naval destruction was to run a campaign.  So, taking a deep breath I thumbed through my trusty back catalogue of wargaming magazines and settled on a Russo-Japanese campaign system devised by David Manley and printed in both Wargames Illustrated (#181) and Miniature Wargames (#265).  The Russo-Japanese War (RJW) was already a front-runner for this project as I was keen to exploit the quick-play pre-dreadnought rules, ‘Damn Battleships Again’ (DBA) by Phil Barker – then freely available on-line.  A quick play-test with card counters, also from the trusty Interweb (see Mikasa example below), was an unqualified success.


Filled with enthusiasm I cast around for miniatures and selected Panzerschiffe’s 1/2400 range.  They make almost every ship I wanted and being resin castings they are easier to convert/modify than metal; especially when drilling holes to mount steel rod masts.  The masts were given tops by rolling strips of paper around the masts and securing with superglue – see photo of the Russian cruiser Rurik I - yards were omitted as too fiddly/fragile for wargame models.  


The ships were mounted on magnetic tiling with a sea texture applied using fast-setting epoxy resin teased into waves and wakes with a cocktail stick.  The ships were fitted with a card spacer before mounting on the base to maintain their freeboard once the sea texture was added.  While the fleets were under construction several further play-tests fine-tuned the rules - I’m an obsessive rule-tweaker - to make the DBA rules more RJW specific and setting out how campaign encounters are translated onto the table.  


Scratch Building Naval Terrain(?) 

An absence of terrain is one the big attractions of naval wargaming, saving money, storage space and set-up time.  Initially I used a blue cloth for the sea but it was not ideal and would ruck if I moved my ships with insufficient care.  Needing a harder and smoother sea surface I visited my local flooring shop and found some vinyl flooring (see photo) that could be cut to match the size of my table with no unsightly joins.  


This not only looked better, but offered a much better user-experience compared to my blue cloth.  Not only does it have a slightly shiny and textured surface better suited to represent water it also lays flat with no creases despite being stored rolled up in my loft.

For islands I used my flocked Hexon hills (by Kallistra), the only other land features, which I made, were the two sides of the channel into Port Arthur.  The photos below show the western arm known as the ‘Tiger’s Tail’...  


... and the eastern shoreline.


These were made from vinyl tiles cut along contour lines and glued atop each other.  These were smeared with PVA glue onto which sand was sprinkled and finally small balsa wood building (5-10mm mm tall) were added.  

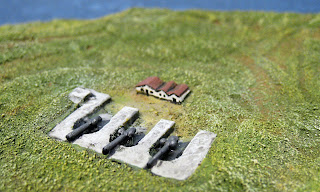
The final touch was a series of coastal battery forts (plasticard and plastic rod) the design of which was based on the structures still visible on Google Earth.  


A Handy Widget for Damn Battleships Again (DBA)

While Phil Barker’s ‘Damn Battleships Again' are fast enough to allow several actions to be fought in a single day’s gaming, I wanted to speed them even further by making some bespoke tools.  After some trial and error, I found all I needed was a single multi-purpose widget for measuring movement (distance and turning), defining arcs of fire and the 'knuckle angle'.  The ‘knuckle’ angle is the tightest turn a squadron in line ahead can make without giving the enemy an advantage when firing at ships turning in sequence at the same point. 

The pictures below show the widget in use to: 

... move (ships move in increments of base lengths); ...  


... move and turn up to the maximum turn allowed (90°); ...


... turn by the maximum allowed without creating a vulnerable 'knuckle'; ...


... and, define the broadside arc of fire.


A Quick Campaign Overview

The campaign theatre of operations is divided into several sea areas (see map). 


The Japanese accrue victory points (VPs) for successfully convoying their army across the sea to seize Port Arthur; 35 VPs being required to win the war.  The Russians win by either denying Japanese VPs or cancelling them out through actions such as bombarding the disembarkation ports.  If the Russians can delay a Japanese win for long enough the Baltic fleet arrives to save the day – or meet a watery doom at Tsushima.  Each turn (two per month), aside from the initial attack on Port Arthur, the players have to apportion their ships across variety mission types; these include patrols, convoy escort, bombardment and minelaying / sweeping.  Players must specify the route that each mission takes to its destination (the return leg is ignored) hopefully avoiding any enemy patrols.  To streamline order writing, bespoke order sheets were used (see 3-mission extract below);  a highlighter was used to indicate the mission type and route so the player only has to write in the number of ships of each type (all ships of the same type have the same characteristics).


Of the different mission types patrolling is the most important.  Successfully patrolling a sea area gives a player control of that area in the following turn which will limit their opponent’s ability to conduct missions because missions may enter an enemy controlled area but may not pass through it.   

SHIP TYPES
AC Armoured Cruiser
LC Light Cruiser
OAC Obsolete Armoured Cruiser
OBB Obsolete Battleship
OPC Obsolete Protected Cruiser
PC Protected Cruiser
TBD Torpedo Boat Destroyer
BB Battleship


Finally Ready!

At last, unlike many other abandoned projects, this one was now ready and war was declared ...      after the attack on Port Arthur!


A campaign narrative will follow in three instalments.